
A small space can feel limiting when you’re trying to set up a dedicated craft room. Supplies pile up, there’s never enough surface area, and finding what you need mid-project turns into a whole ordeal.
Sound familiar?
But a tight square footage doesn’t mean you have to compromise on functionality or style. With the right DIY small-craft-room ideas, you can build a space that genuinely works for you.
This blog covers practical small craft room designs, layouts, smart storage solutions, and budget-friendly setups that make the most of every inch you’ve got.
Why You Need a DIY Small Craft Room
Having a designated space for crafting is essential for maximizing creativity and productivity. A DIY small craft room offers a dedicated area where you can organize your materials, focus on your projects, and keep everything in one place.
When crafting is confined to a specific room or corner, it’s easier to keep the rest of your home neat and tidy.
A personal crafting zone helps eliminate distractions, allowing you to immerse yourself fully in the creative process. Plus, the act of organizing your craft supplies can make projects more enjoyable, as you’ll always know where to find what you need.
Ultimately, having your own crafting space not only improves your creative flow but also helps maintain a sense of order in your home.
DIY Small Craft Room Ideas for Every Crafter
From clever storage solutions to personalized decor, here you’ll find practical tips and inspiring designs to turn your small craft room into a functional and stylish haven.
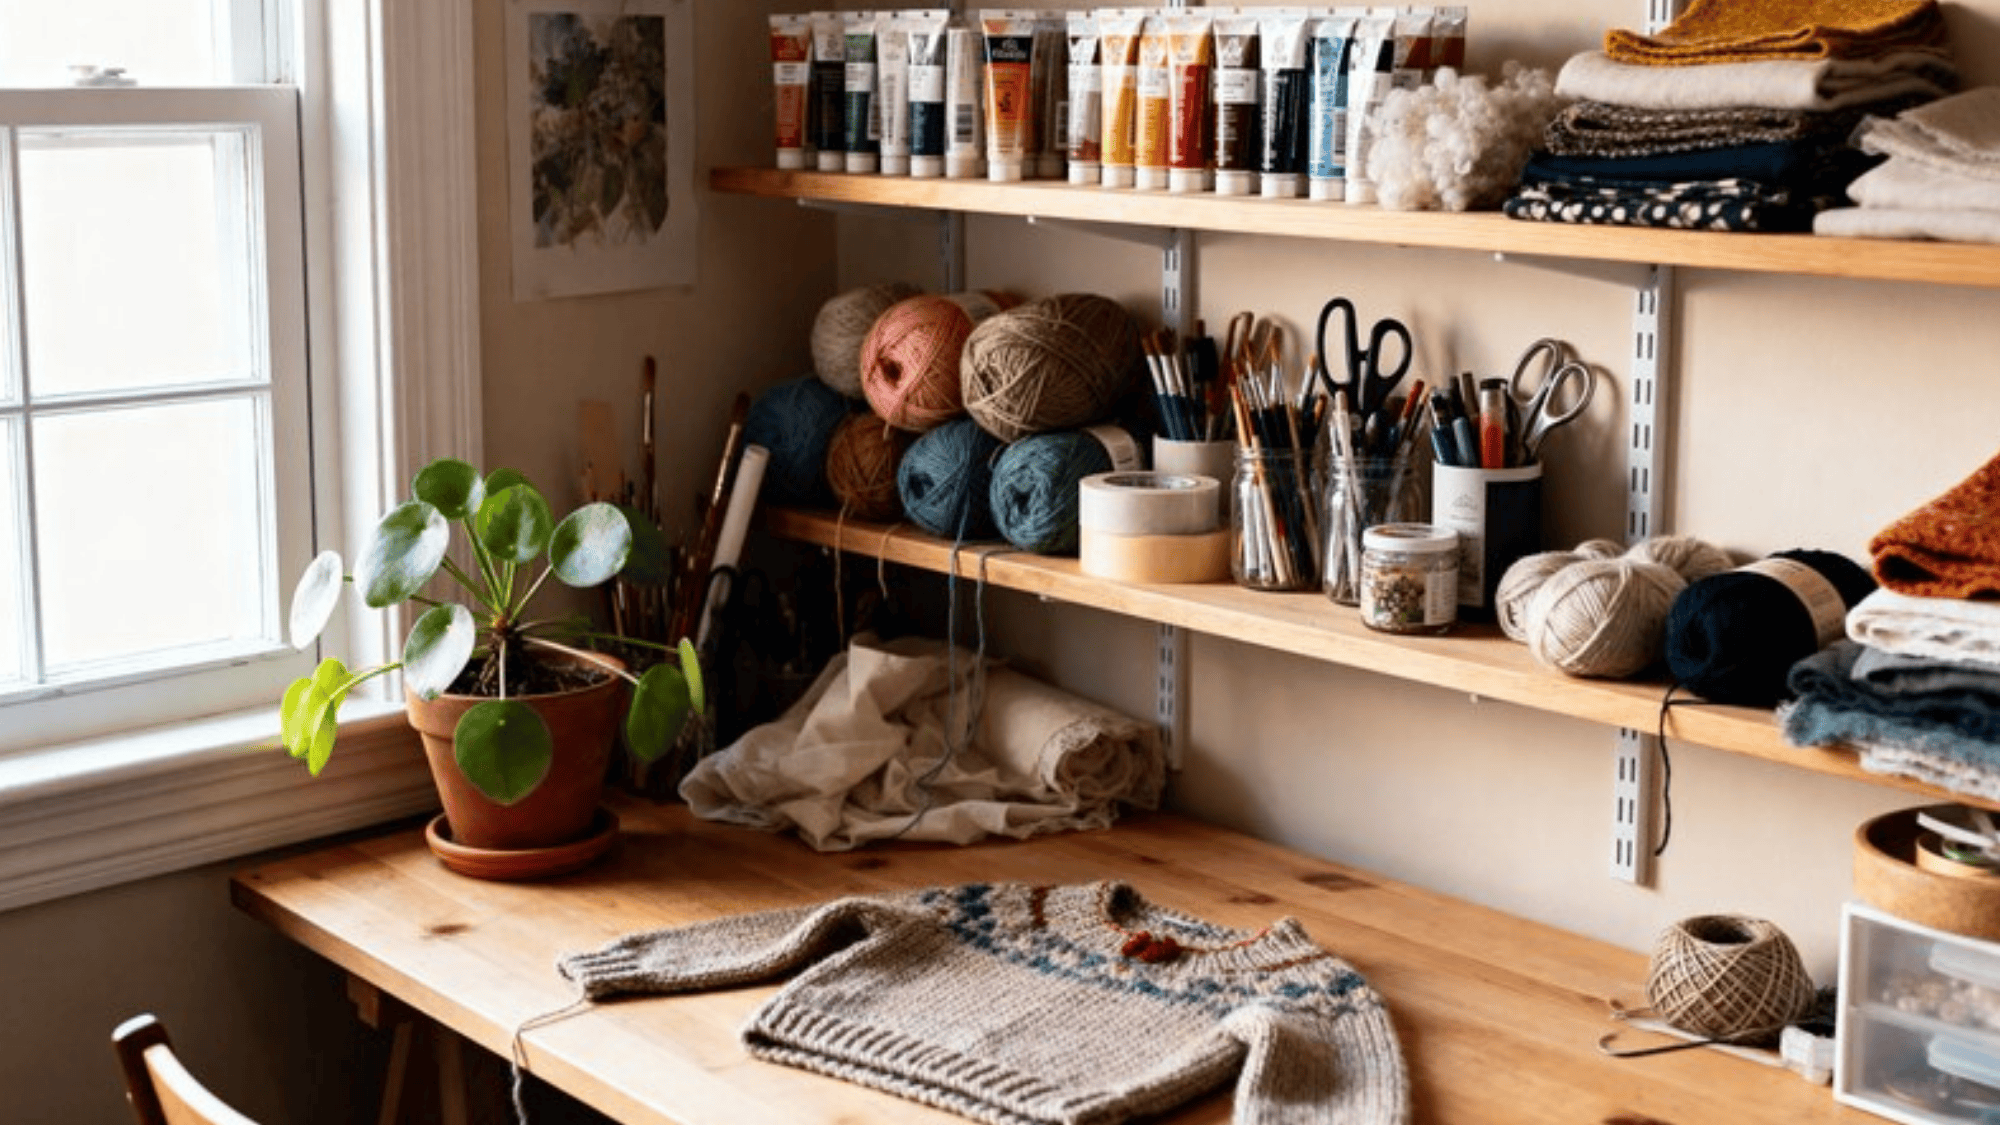
Storage & Organization Ideas
Getting your storage right is honestly half the battle in a small craft room. These ideas focus on keeping your supplies accessible, visible, and neatly sorted without overwhelming the space.
1. Vertical Shelving for Storage
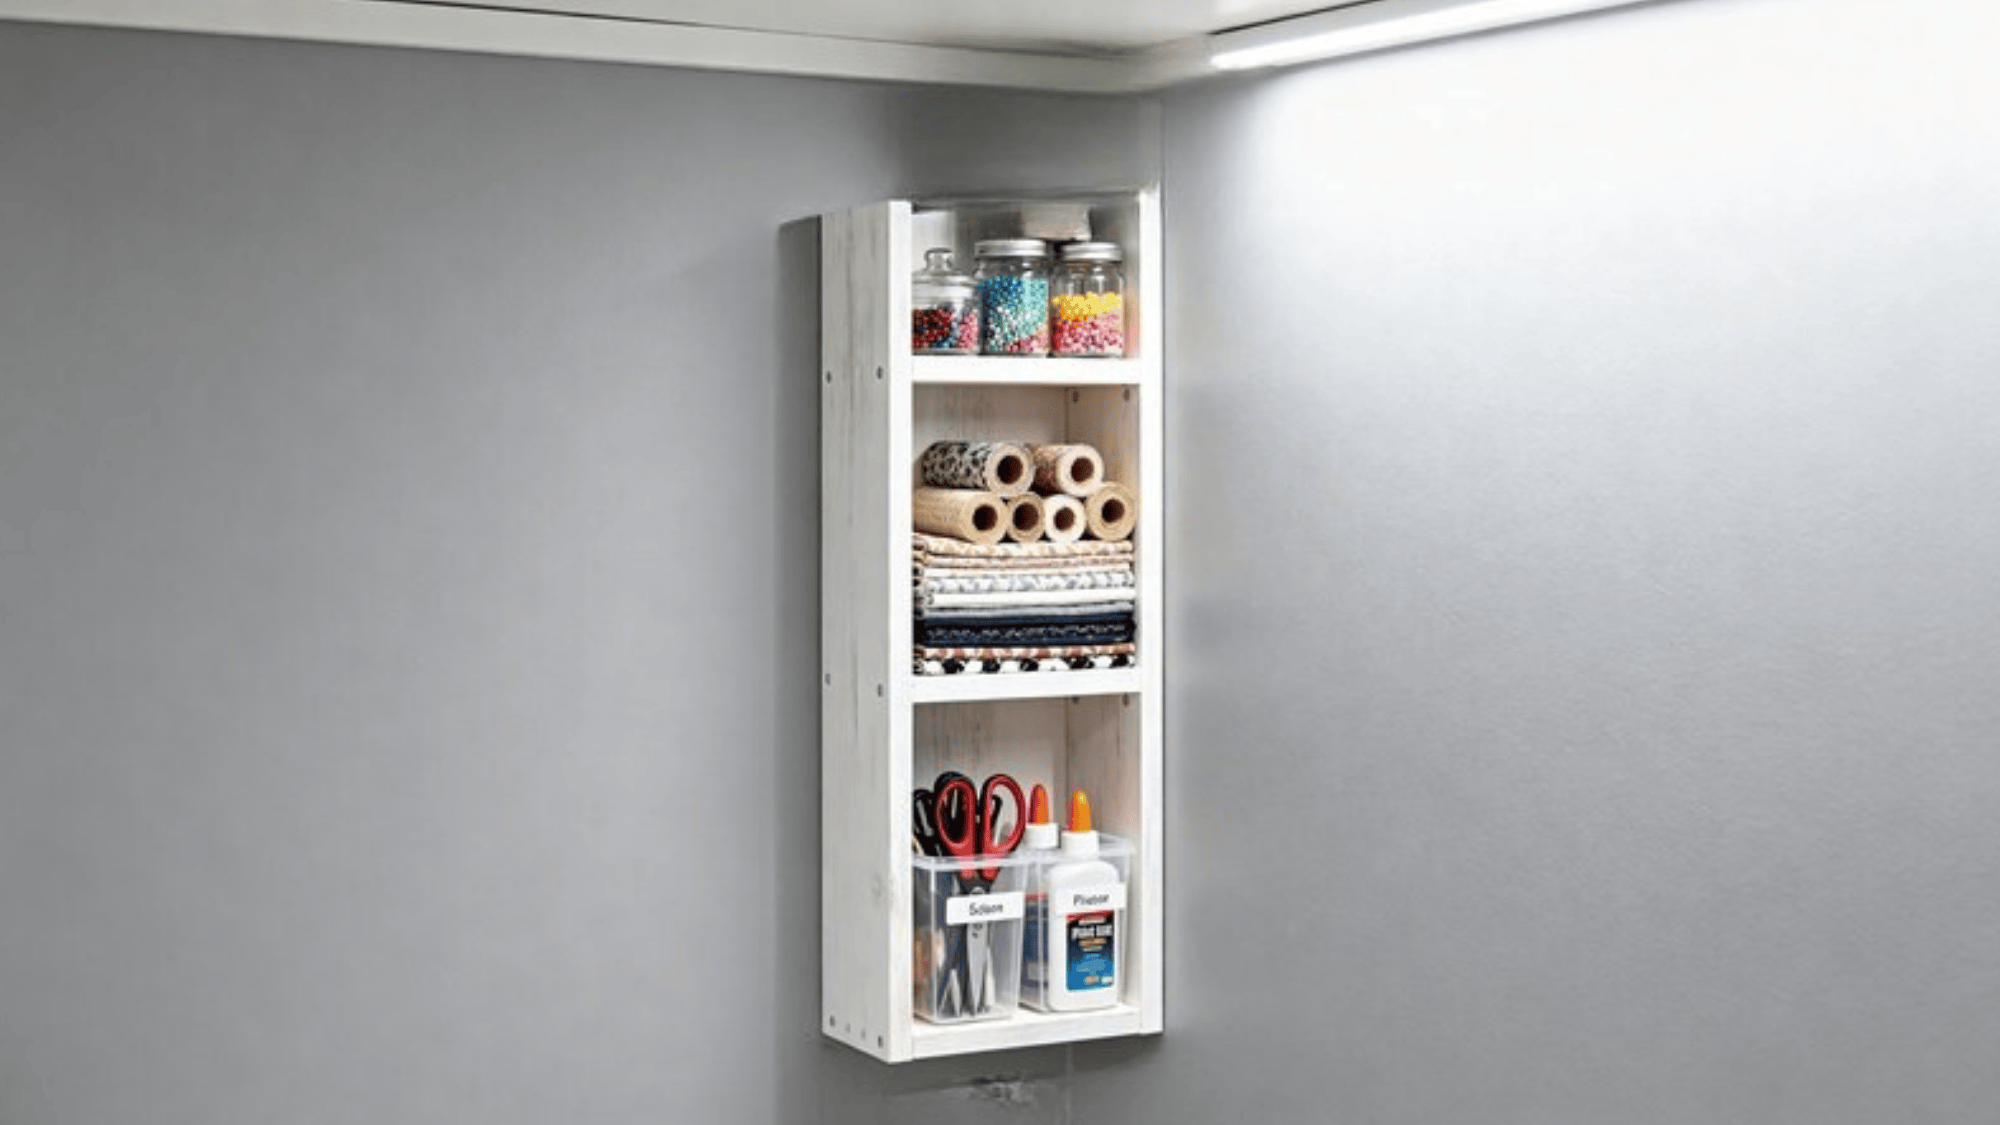
- What it is: Wall-mounted shelves that make use of vertical space to store materials, tools, and supplies without taking up floor space.
- Budget-friendly: Very budget-friendly, basic shelving brackets and boards from a hardware store can cost as little as $20–$40.
- DIY steps: Locate wall studs using a stud finder, mark your desired shelf height, screw in brackets, and lay your boards across them. Sand and paint the boards beforehand for a cleaner finish.
2. Pegboards for Easy Organization
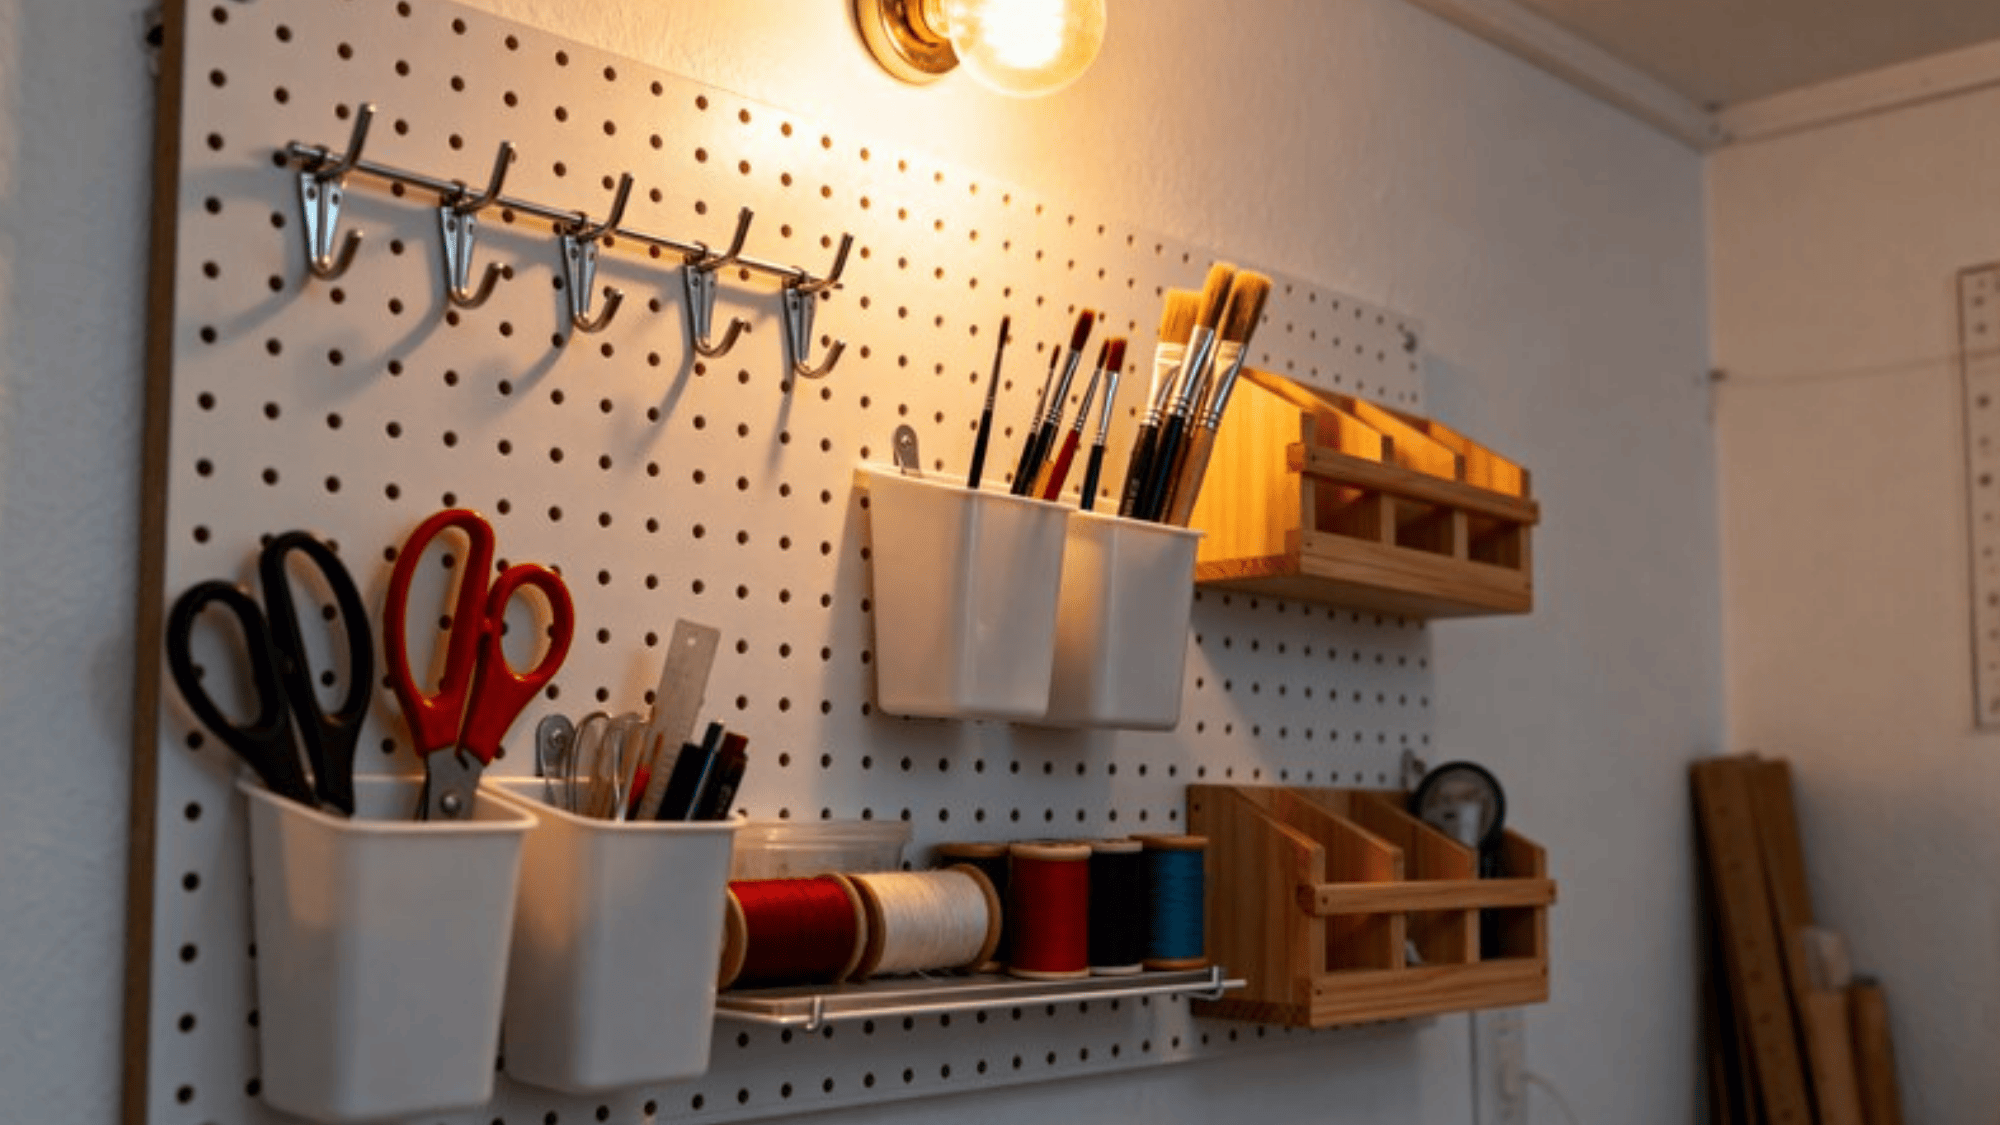
- What it is: A perforated board mounted on the wall where you can hang hooks, bins, and holders to keep tools and supplies within reach.
- Budget-friendly: Very budget-friendly, pegboards are inexpensive, and the hooks are cheap to buy in bulk.
- DIY steps: Cut the pegboard to your desired size, mount it to the wall using spacers to allow room for the hooks at the back, then arrange hooks and holders based on what you use most.
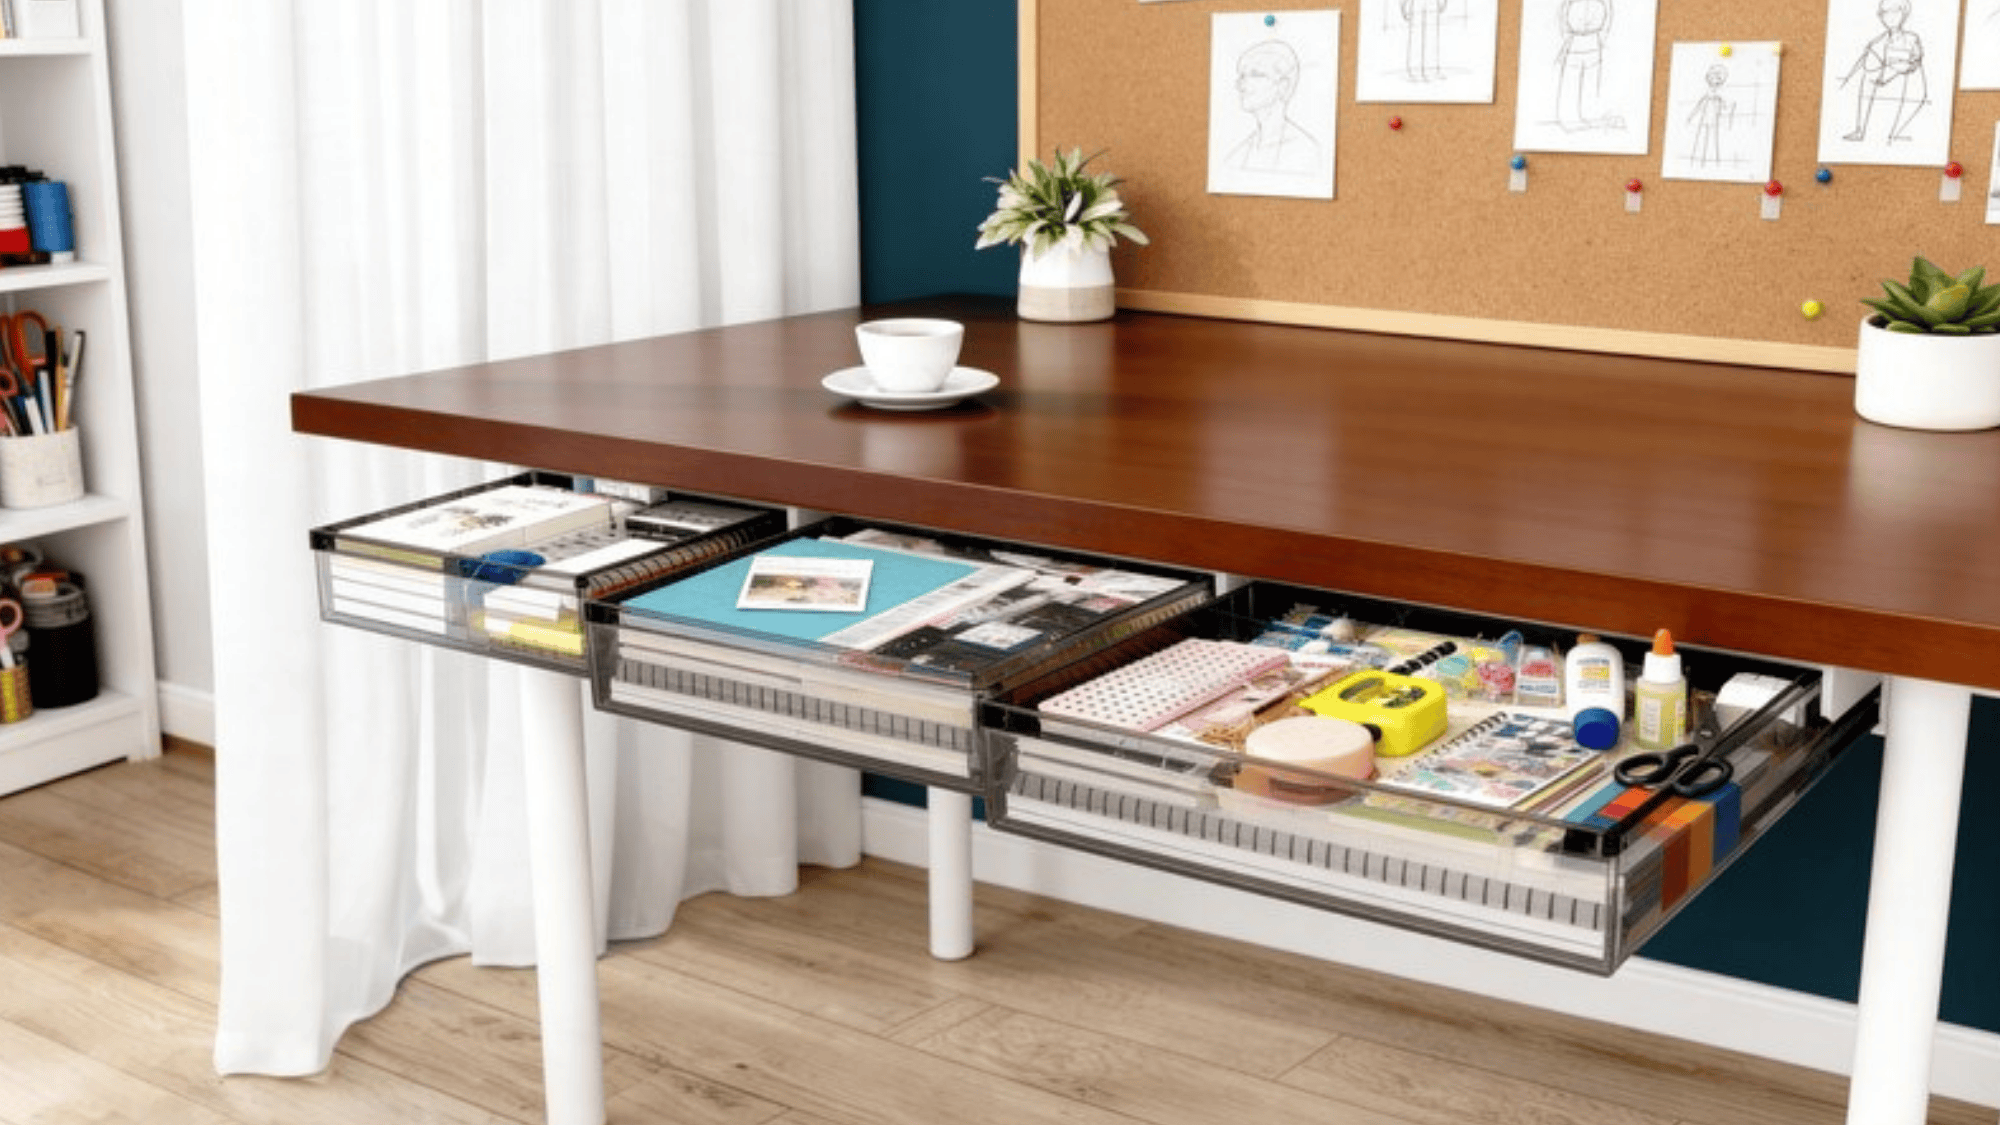
3. Under-Desk Storage
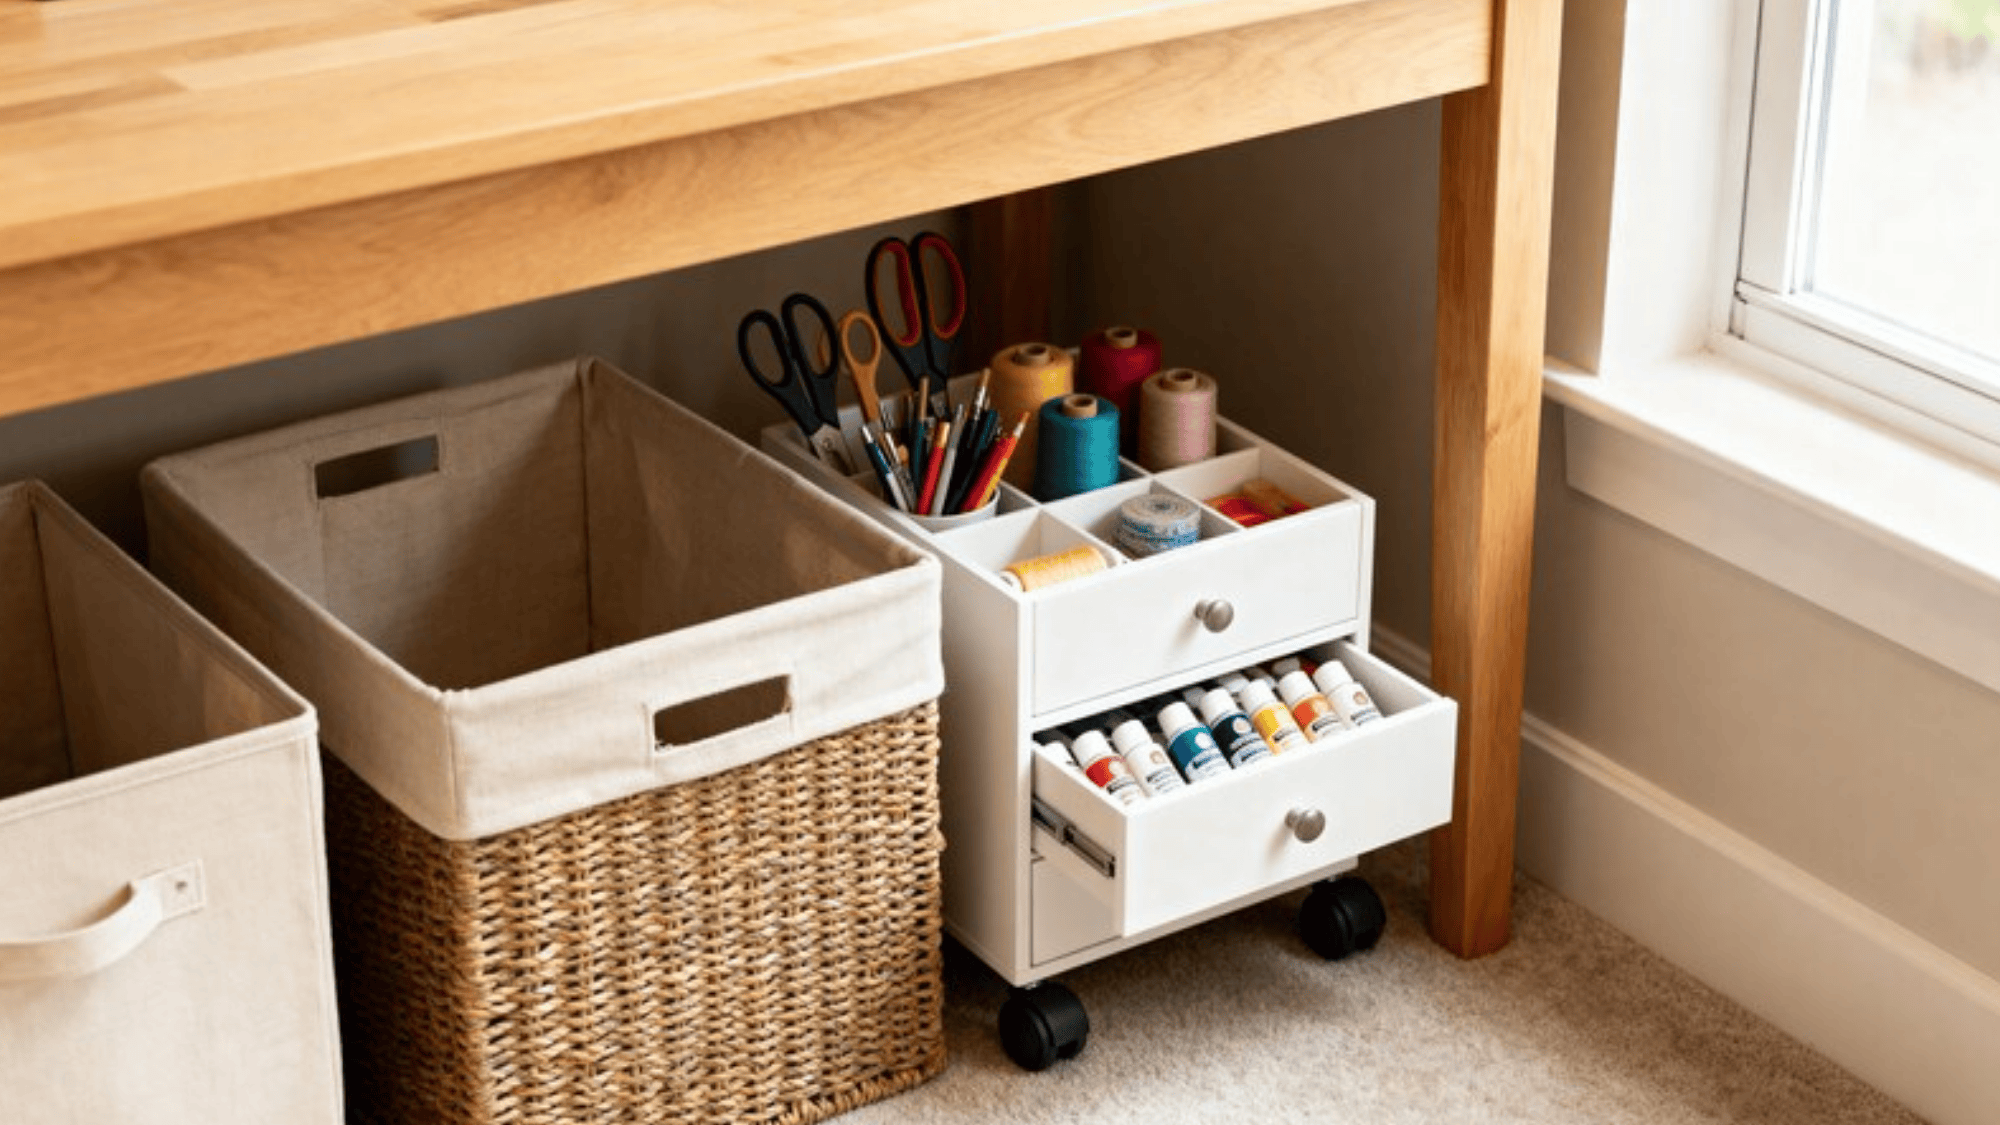
- What it is: Using the space beneath your desk for bins, baskets, or small rolling drawers to store supplies out of sight.
- Budget-friendly: Very budget-friendly, a few stackable bins or a small rolling unit is all you need.
- DIY steps: Measure the clearance under your desk, pick bins or a rolling cart that fits, and assign each container a specific supply category. Label the fronts so you can grab what you need quickly.
4. Clear Storage Containers
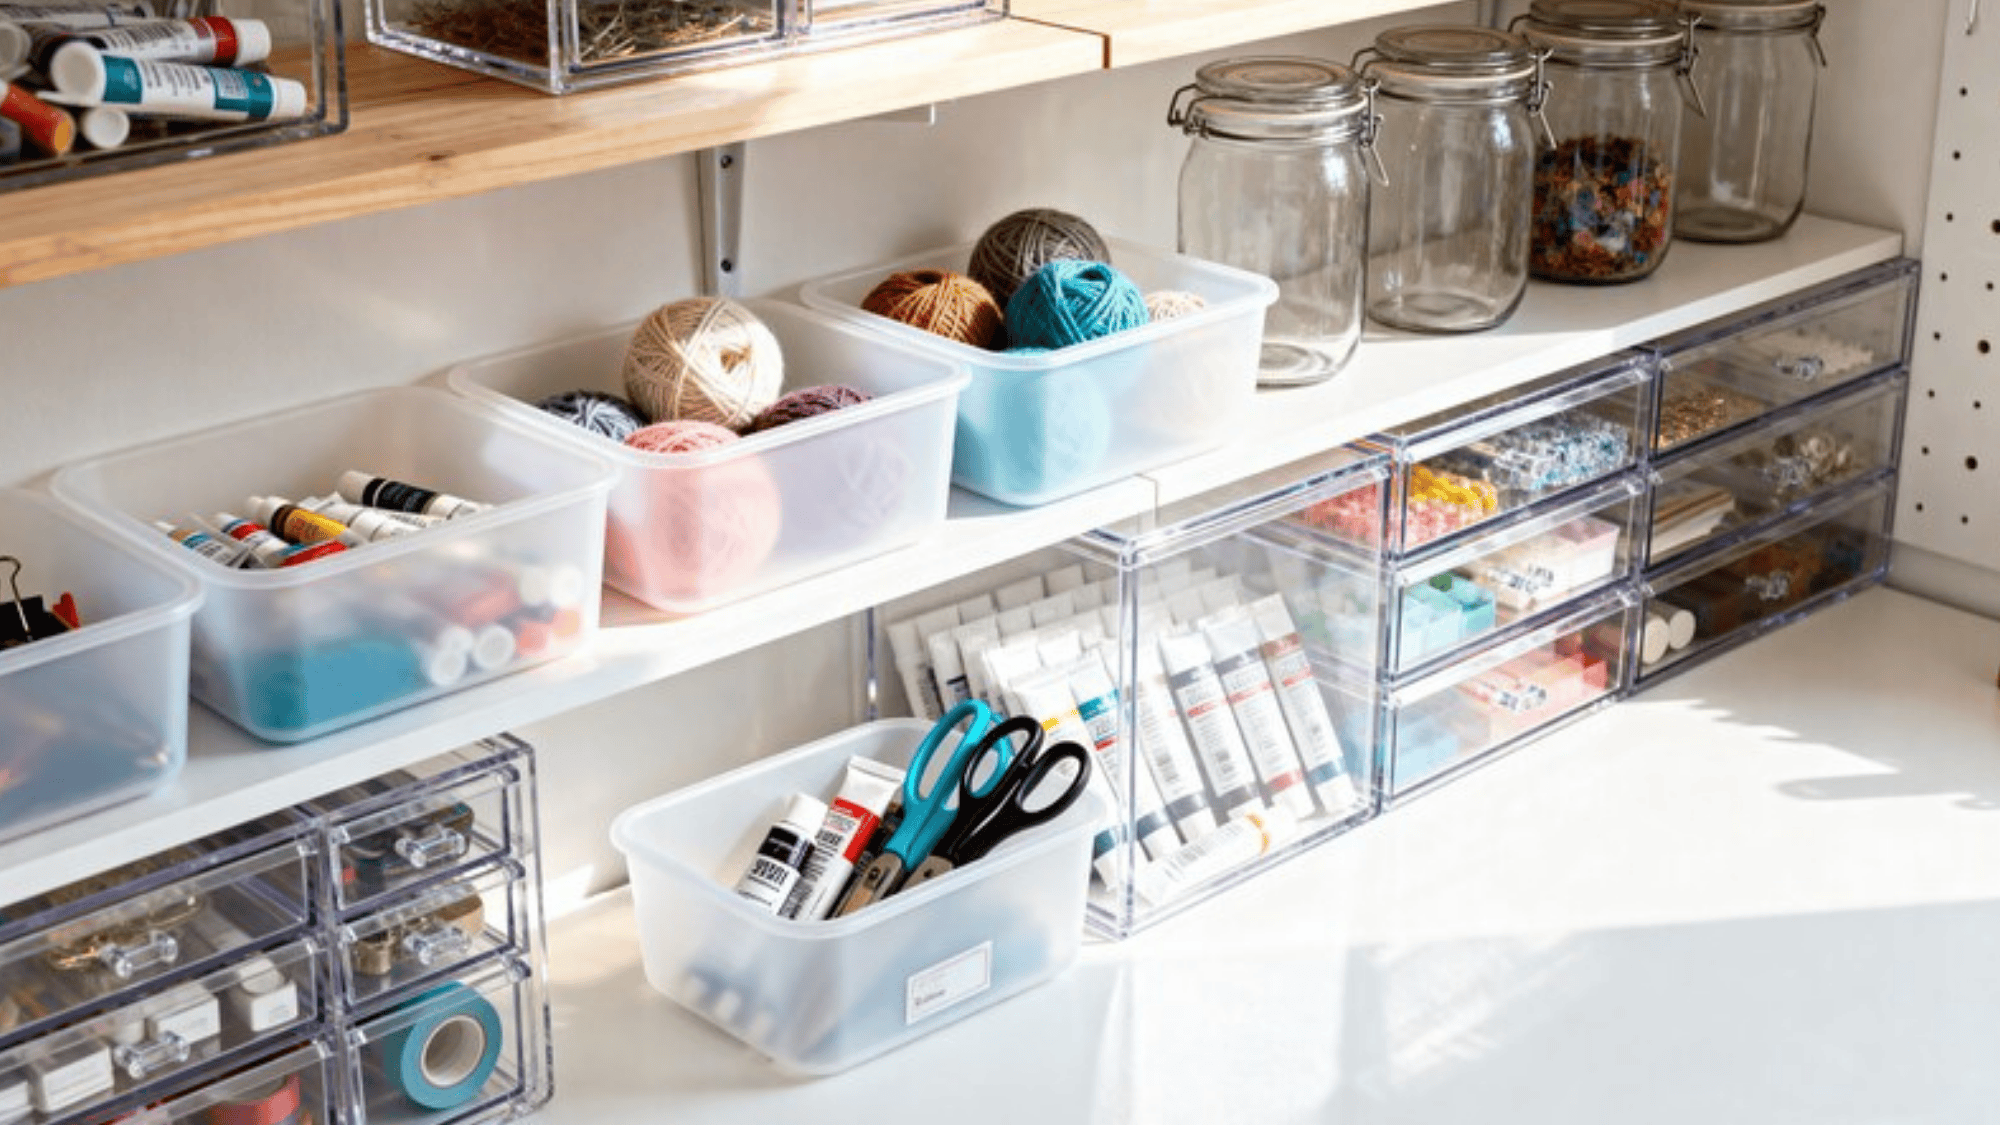
- What it is: Transparent bins, jars, and boxes that let you see exactly what’s inside without opening everything up.
- Budget-friendly: Very budget-friendly, clear containers are available at dollar stores and come in all sizes.
- DIY steps: Sort supplies by type, place them into appropriately sized clear containers, and arrange them on shelves or inside drawers. Add labels to the front or lid for even faster access.
5. Rolling Carts for Easy Mobility
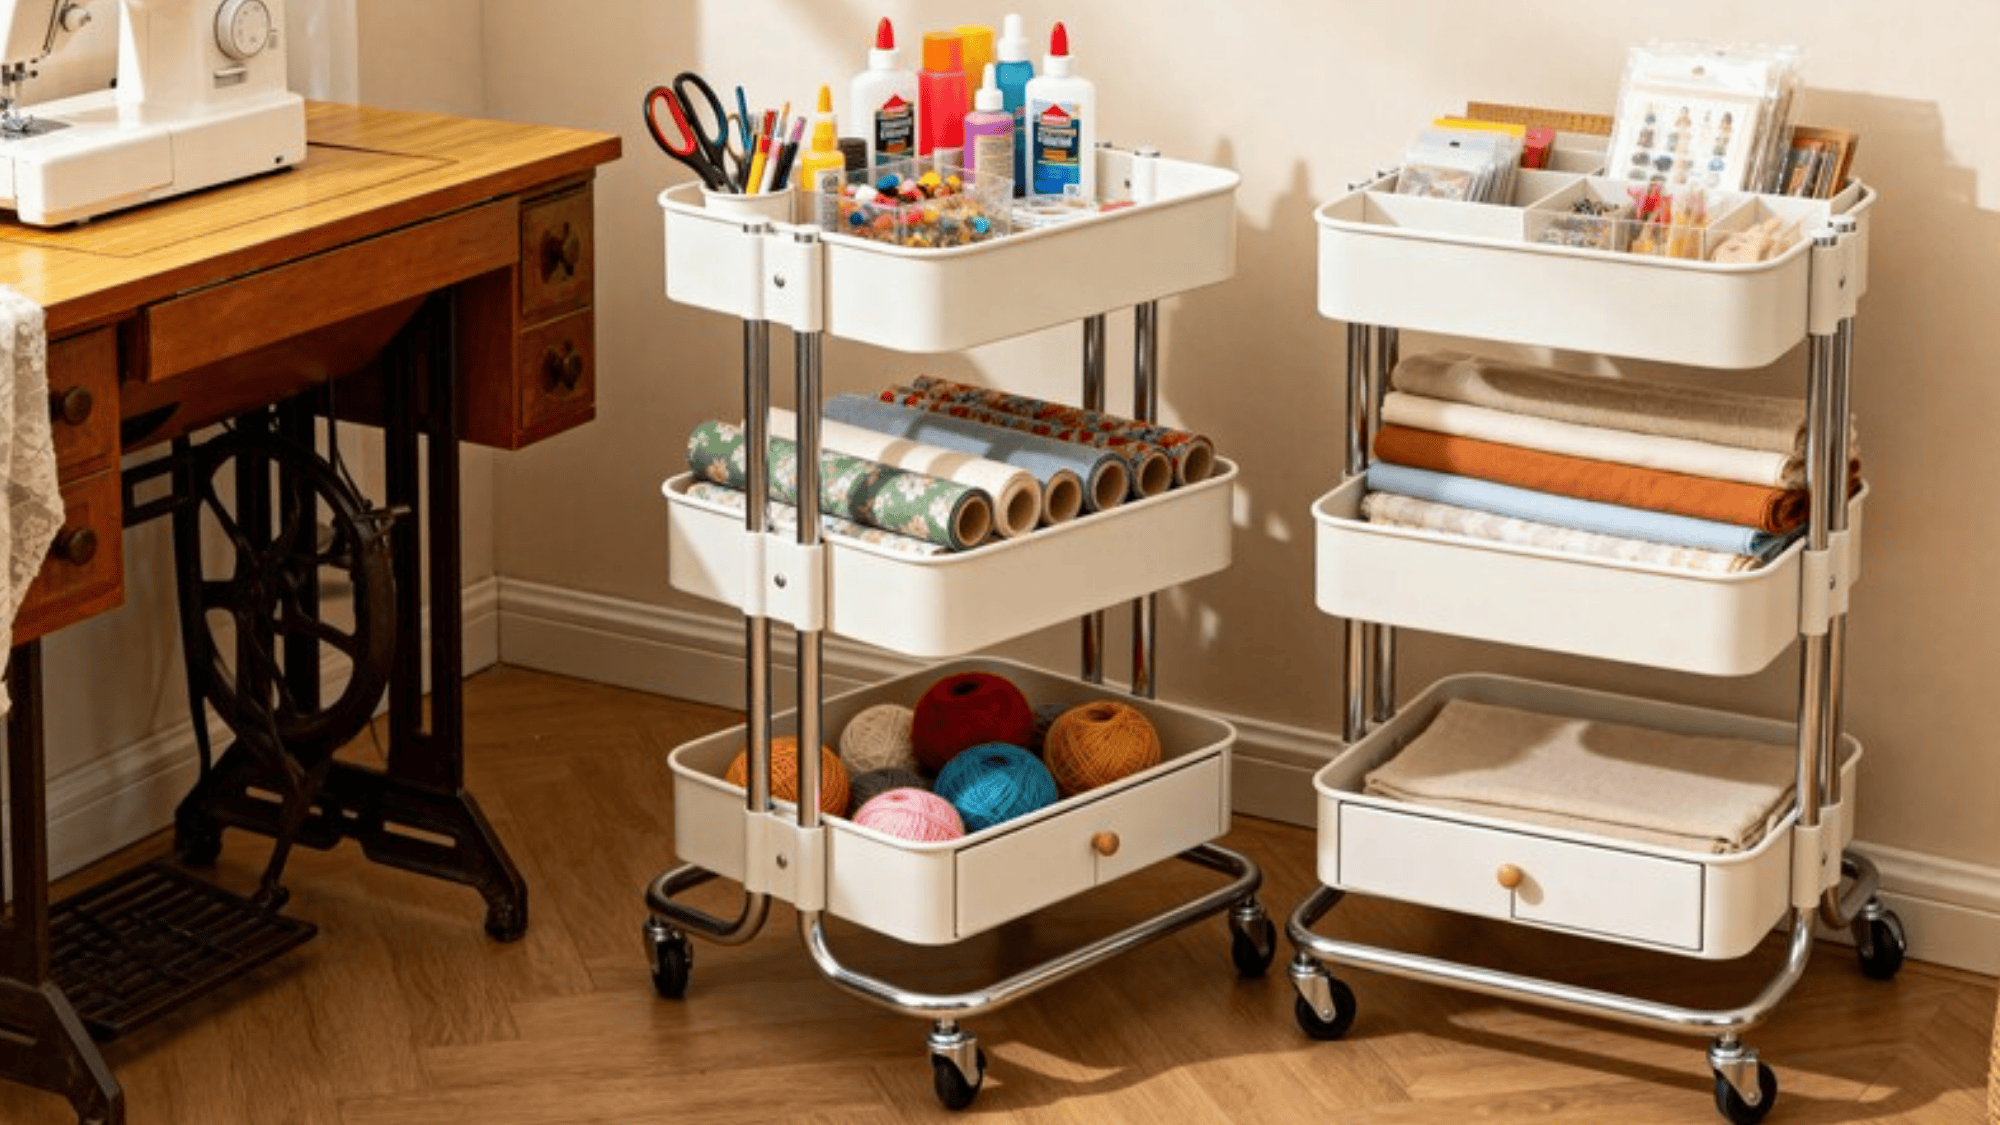
- What it is: Wheeled carts with multiple tiers or drawers that can be moved around the room as needed.
- Budget-friendly: Very budget-friendly, basic rolling carts are available for $20–$50 at most home goods stores.
- DIY steps: Assemble the cart per the instructions, then sort supplies by type into each tier. Add small bins or dividers inside the shelves to keep things from sliding around.
6. Color-Coded Storage
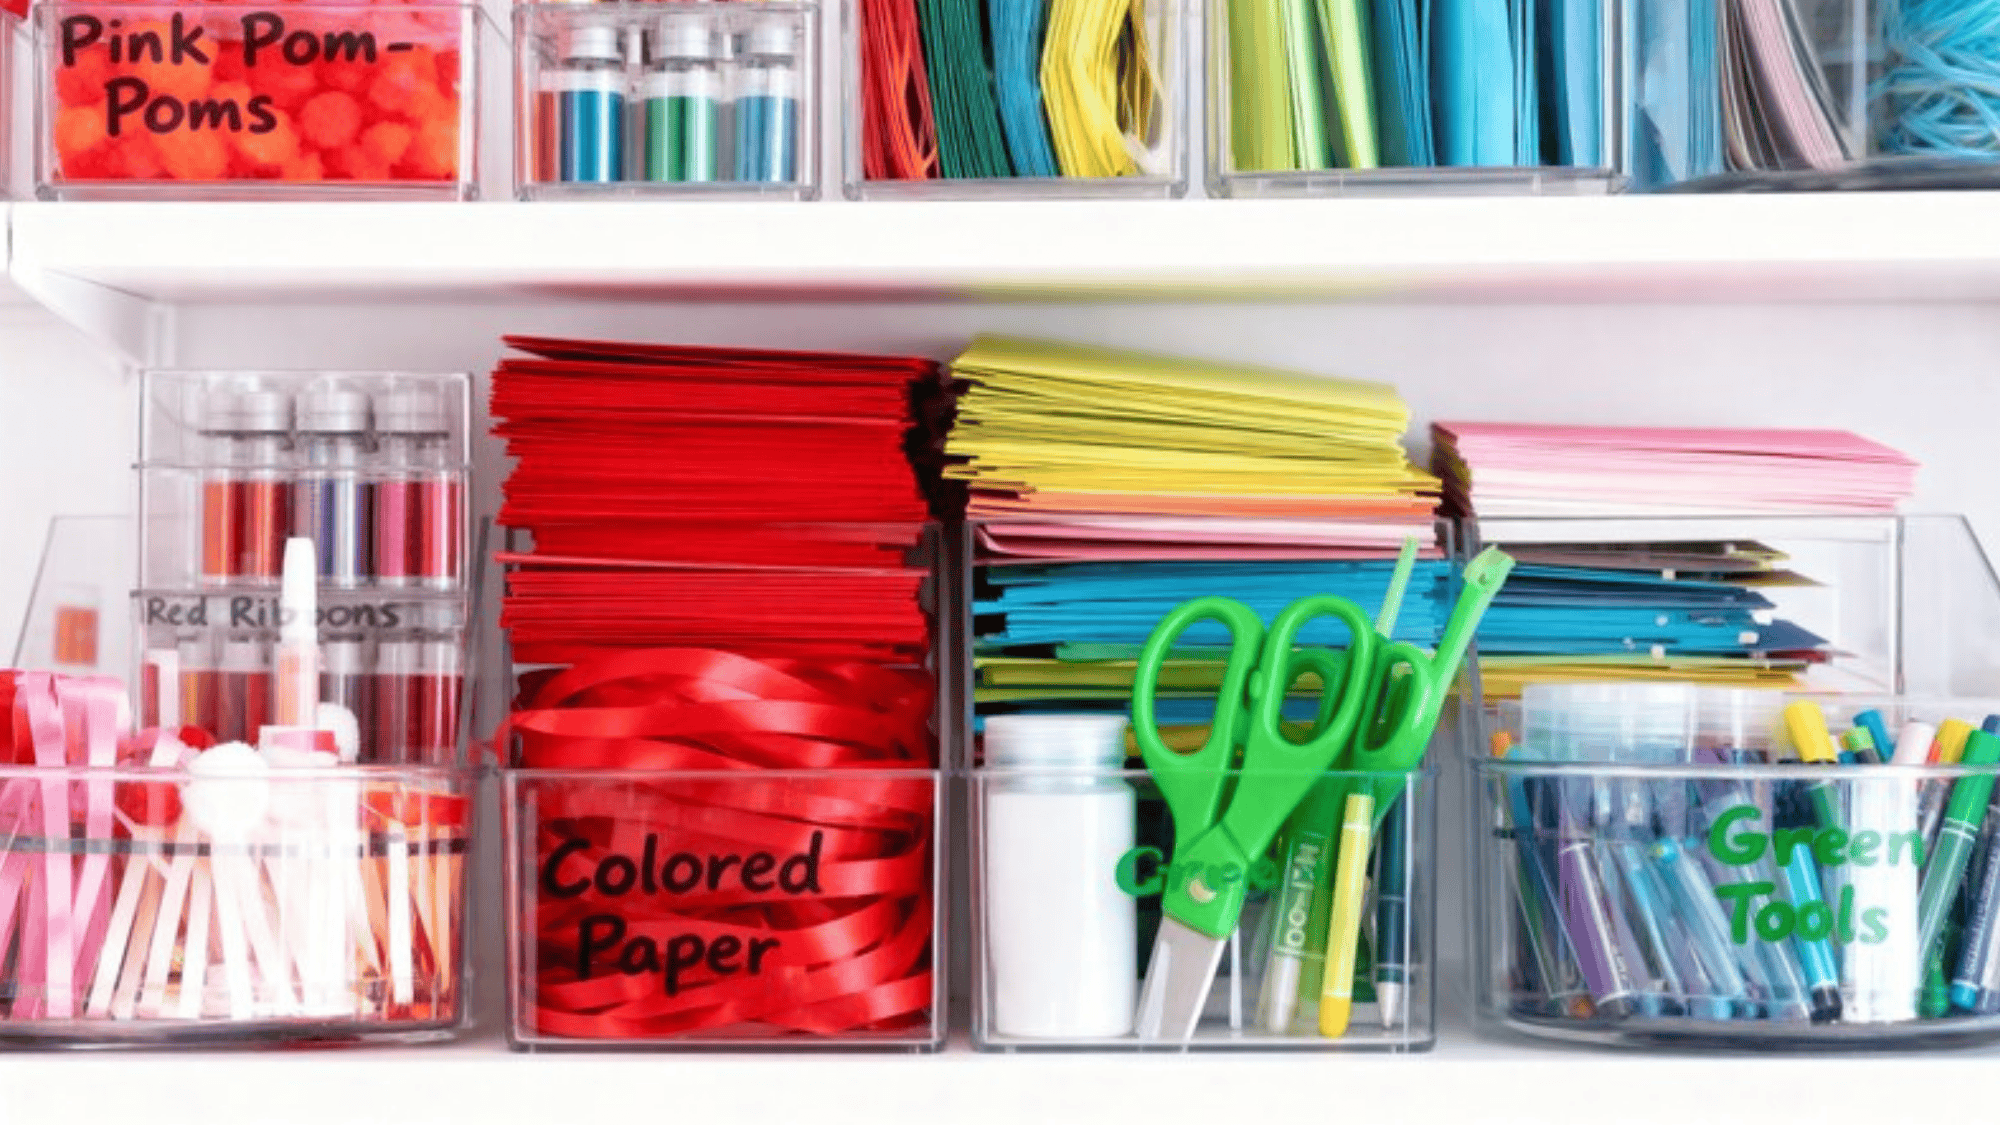
- What it is: A storage system where supplies are sorted and labeled by color, making it faster to find what you need.
- Budget-friendly: Very budget-friendly, colored bins, tape, and labels are all inexpensive and easy to find.
- DIY steps: Assign a color to each supply category, pick matching bins or add colored labels, and sort your supplies accordingly. Arrange the bins on shelves in a consistent order so the system stays intuitive.
7. Wire Baskets for Fabric Storage
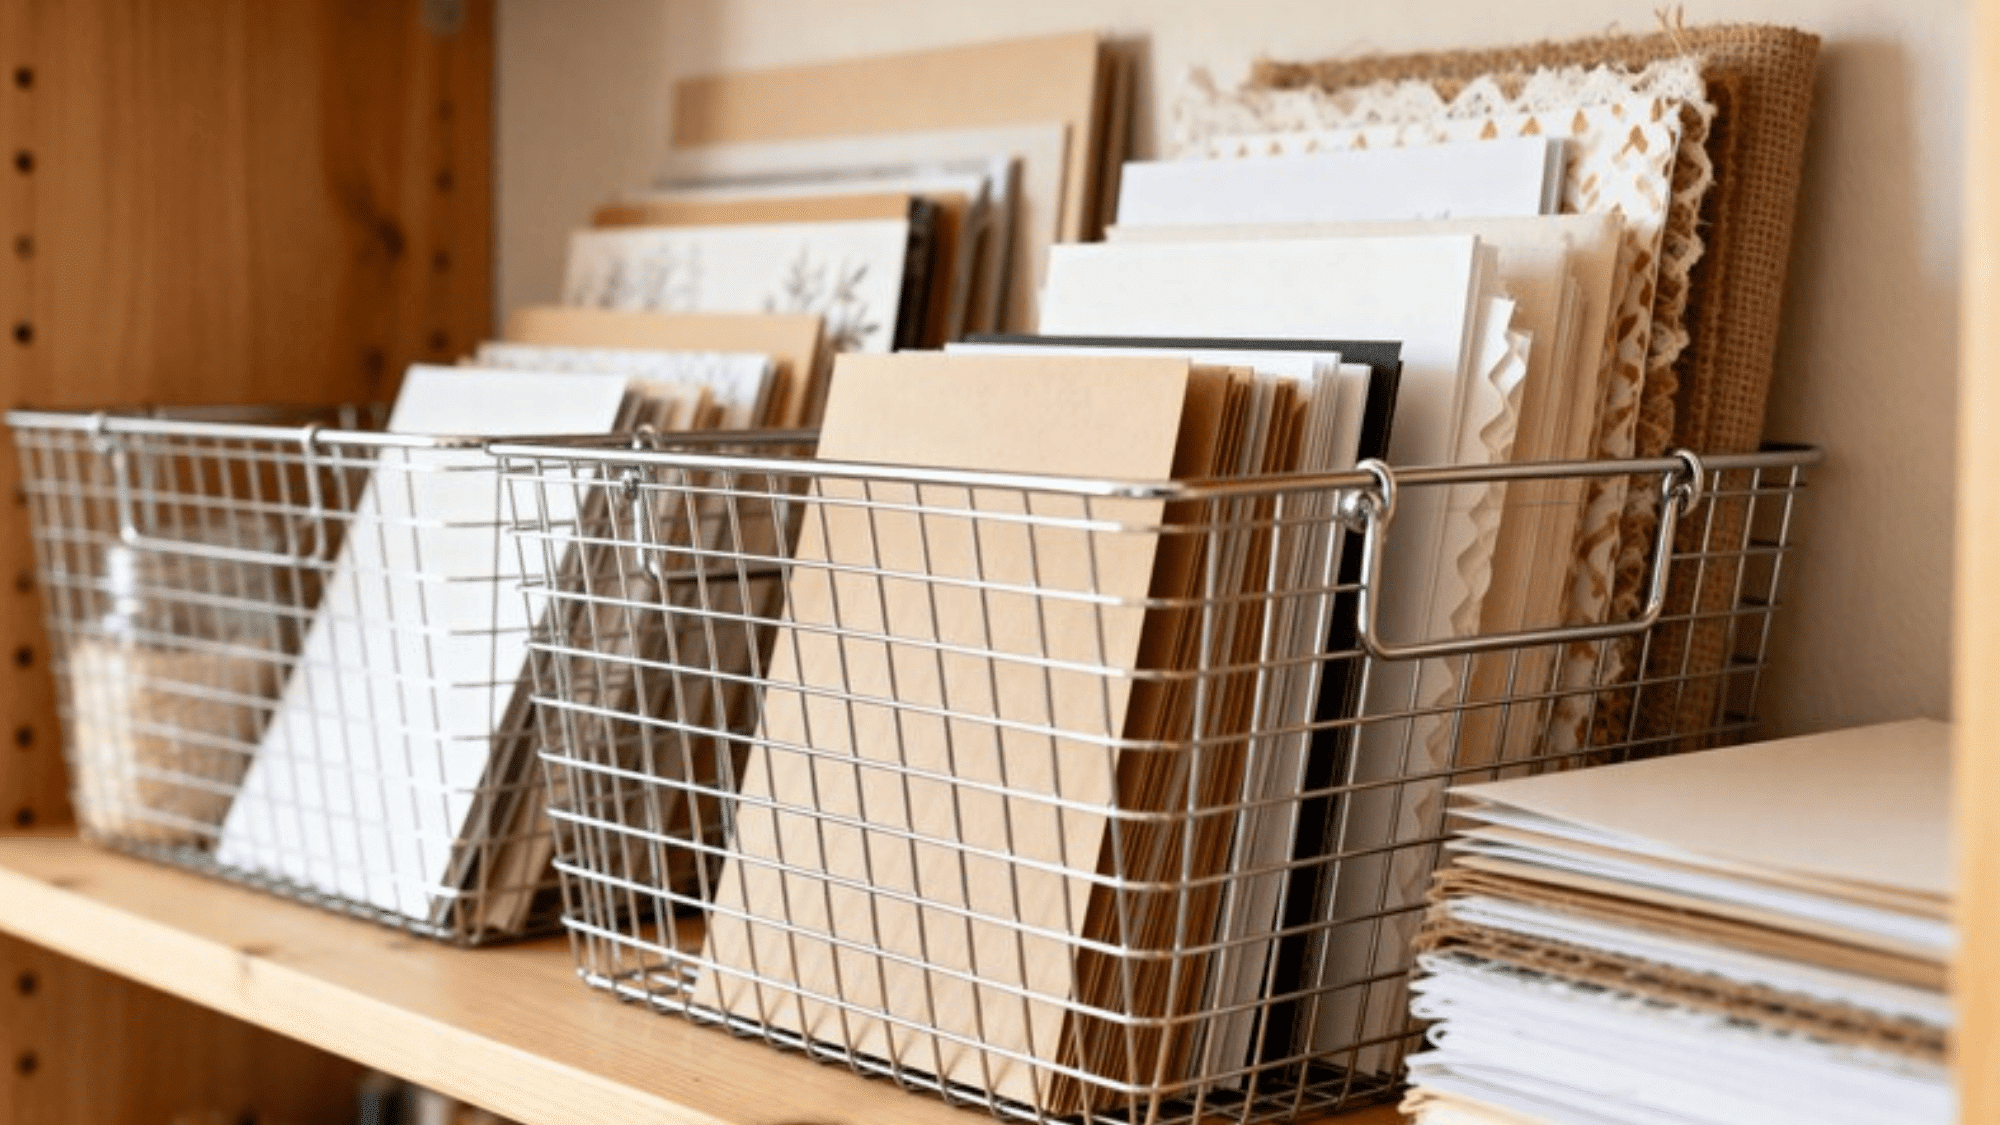
- What it is: Open wire baskets used to store and display folded fabric, making it easy to see and access different materials.
- Budget-friendly: Very budget-friendly, wire baskets are inexpensive and available at most home stores.
- DIY steps: Fold fabric pieces neatly and sort them by color or type. Place them upright in the baskets so you can flip through them easily. Stack the baskets on shelves or mount them on a wall-mounted rack.
8. Use Fabric Storage Bins for Organizing
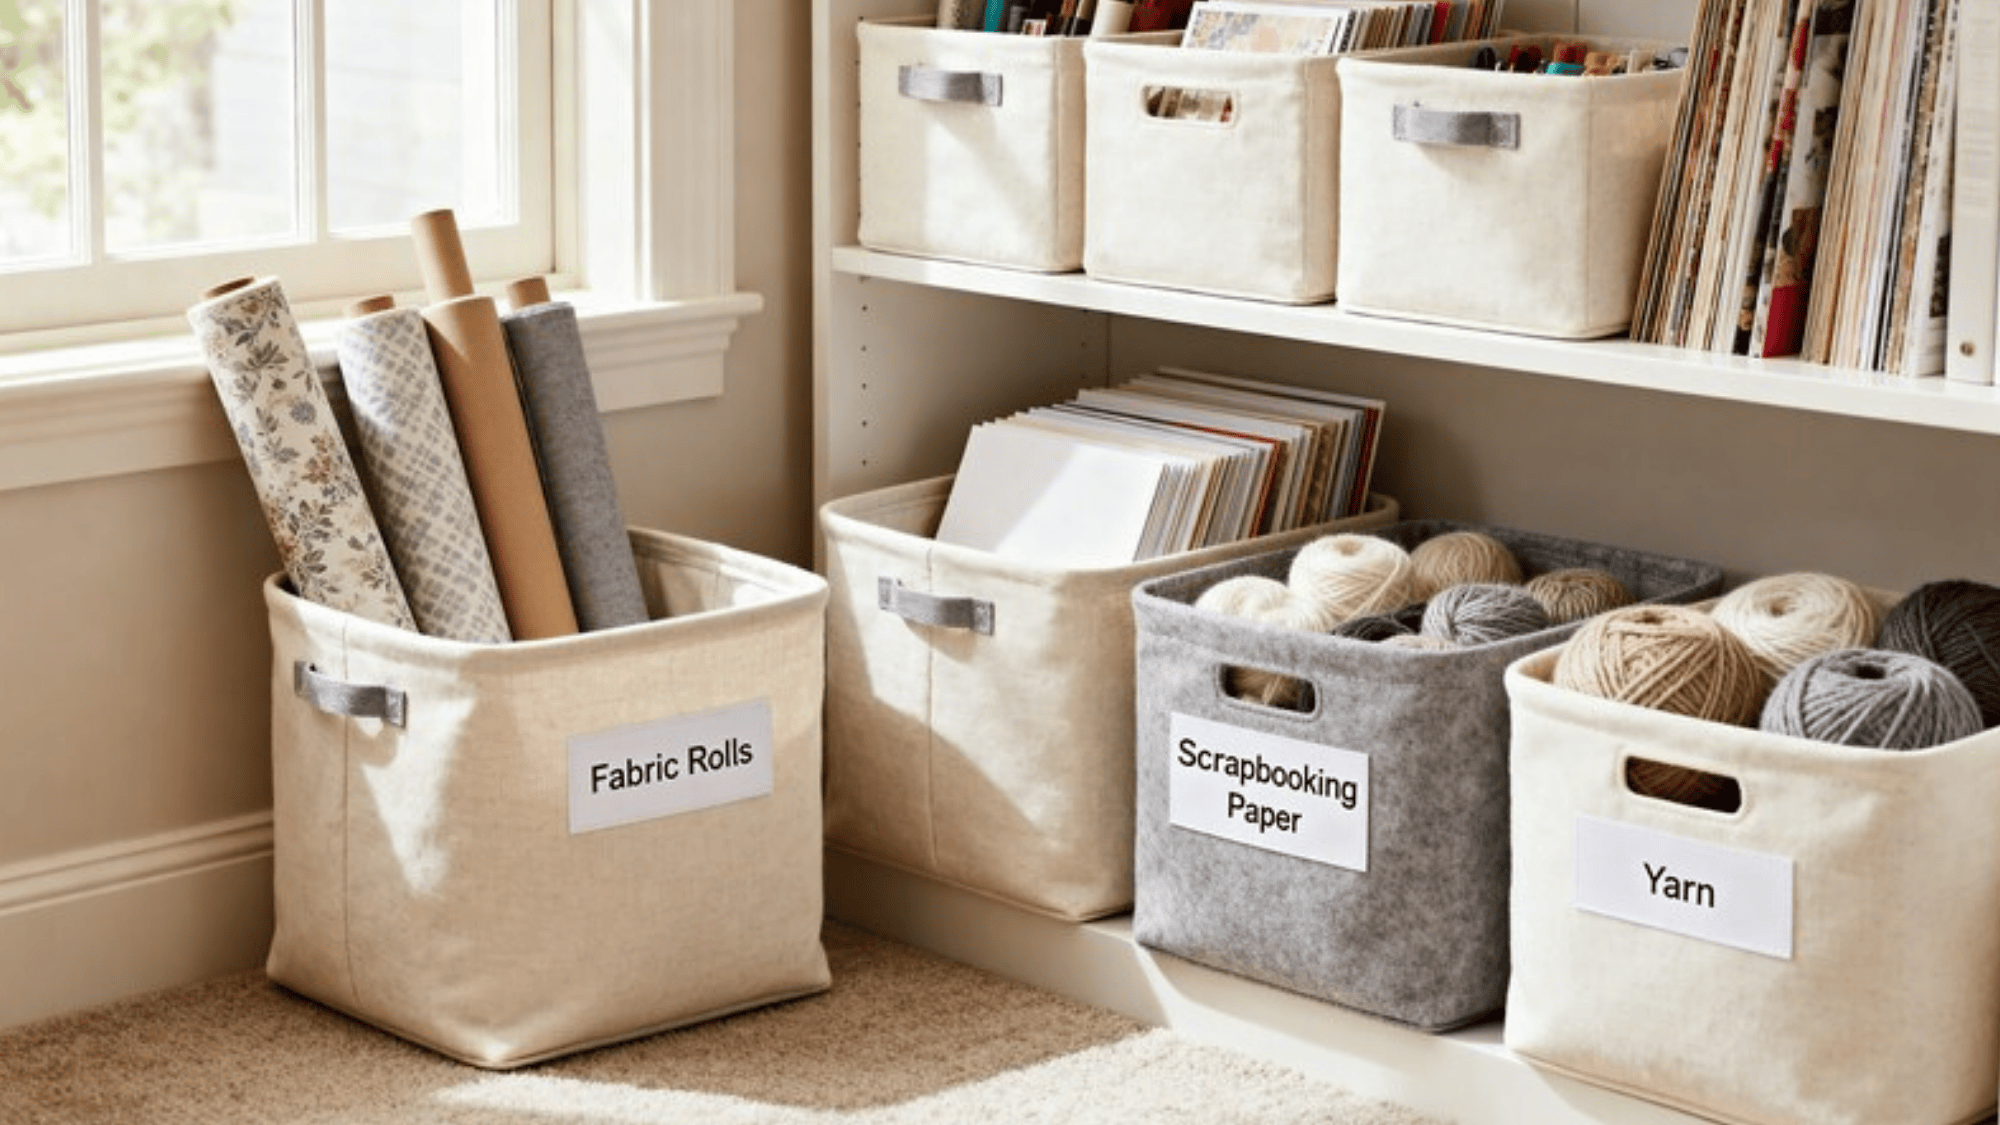
- What it is: Soft-sided fabric bins used to organize larger supplies like fabric rolls, scrapbooking paper, and yarn.
- Budget-friendly: Very budget-friendly, fabric bins are affordable and come in many sizes and colors.
- DIY steps: Sort your supplies by type or project, place them into appropriately sized fabric bins, and stack or line them up on shelves. Add tags or labels to the front so you can identify contents at a glance.
9. Crafting Wall with Magnetic Strips
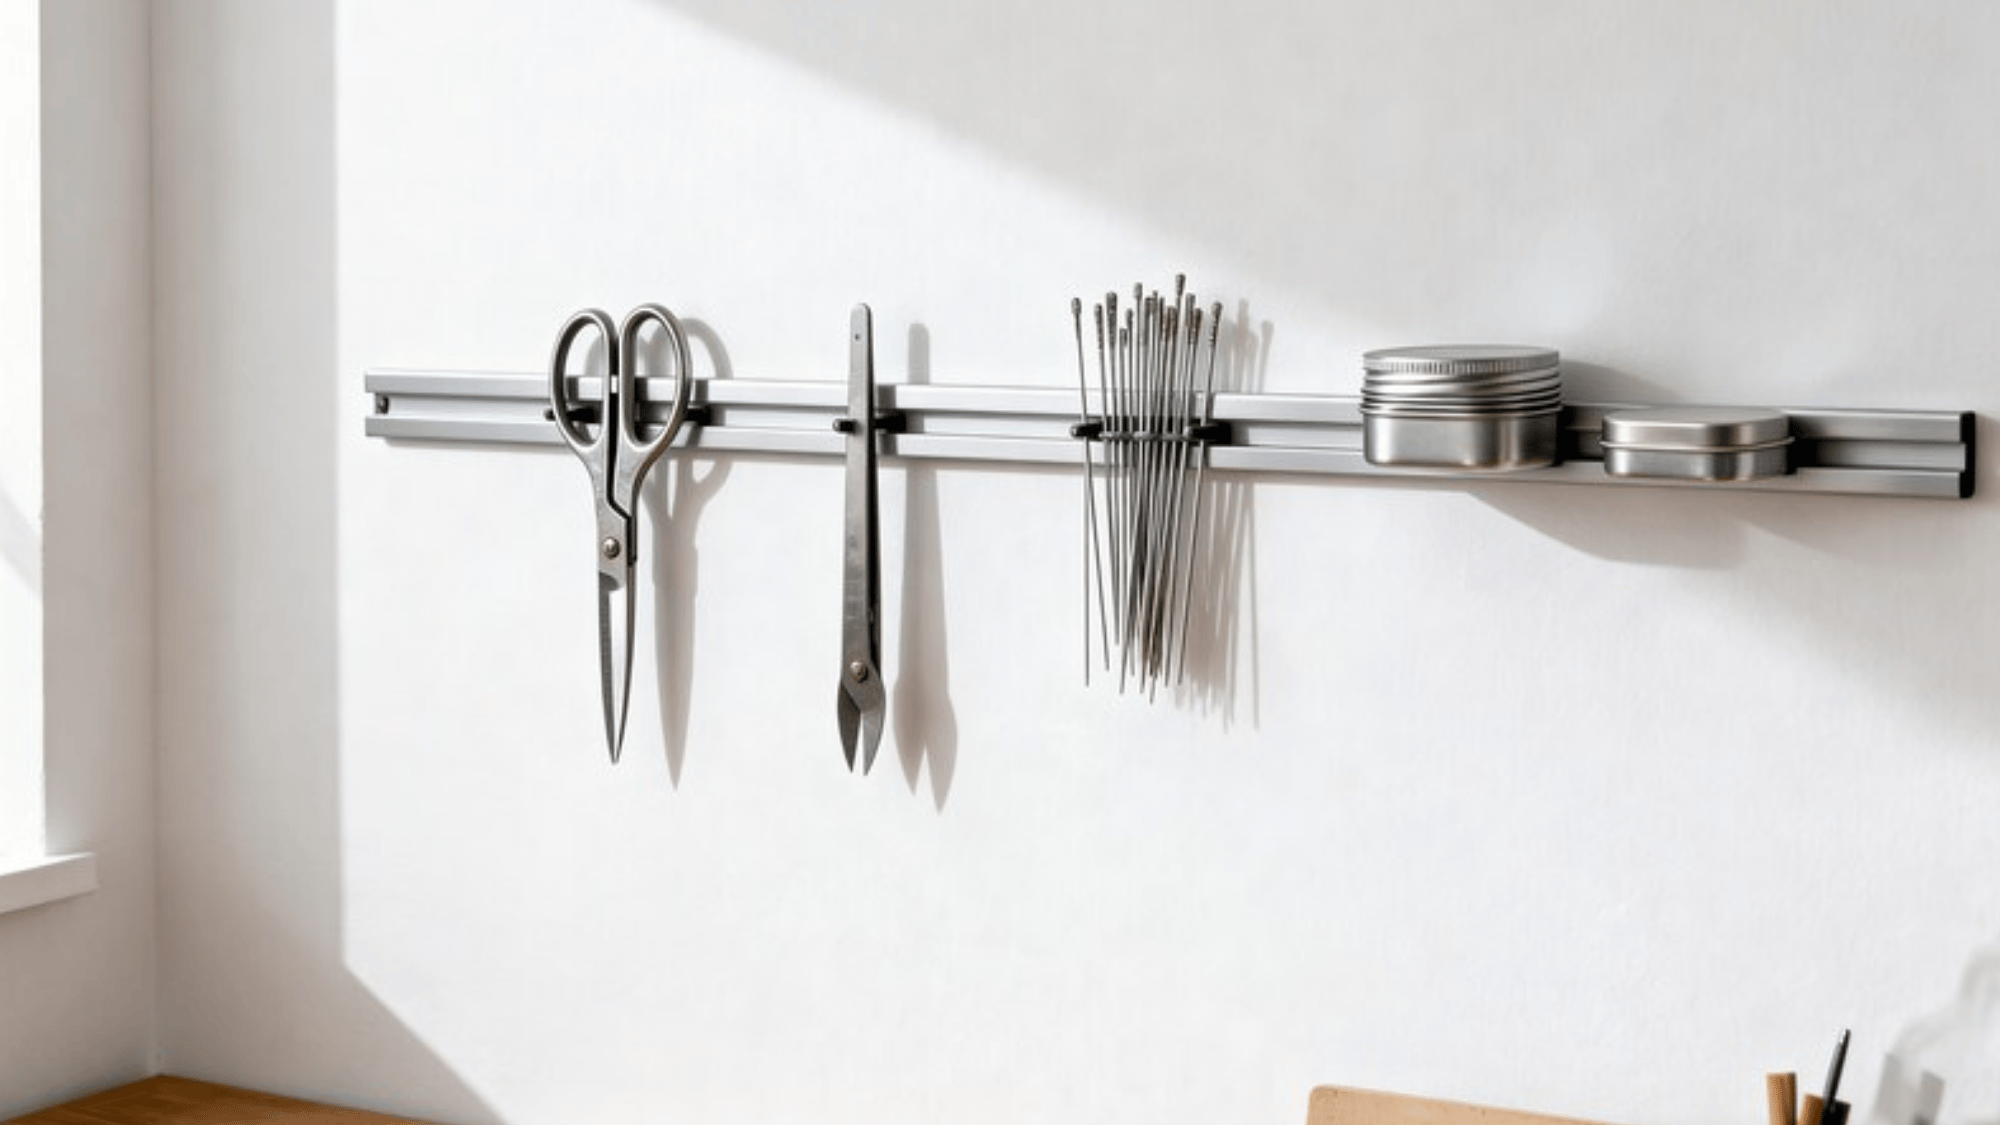
- What it is: Magnetic strips mounted on the wall to hold metal crafting tools like scissors, needles, and small tins.
- Budget-friendly: Very budget-friendly, magnetic strips are inexpensive and mount easily with screws or adhesive.
- DIY steps: Choose a spot on the wall near your work surface, mount the magnetic strip using screws or strong adhesive, and attach your metal tools directly to the strip. Group similar tools together for a neater look.
10. Mason Jar Wall Organizer
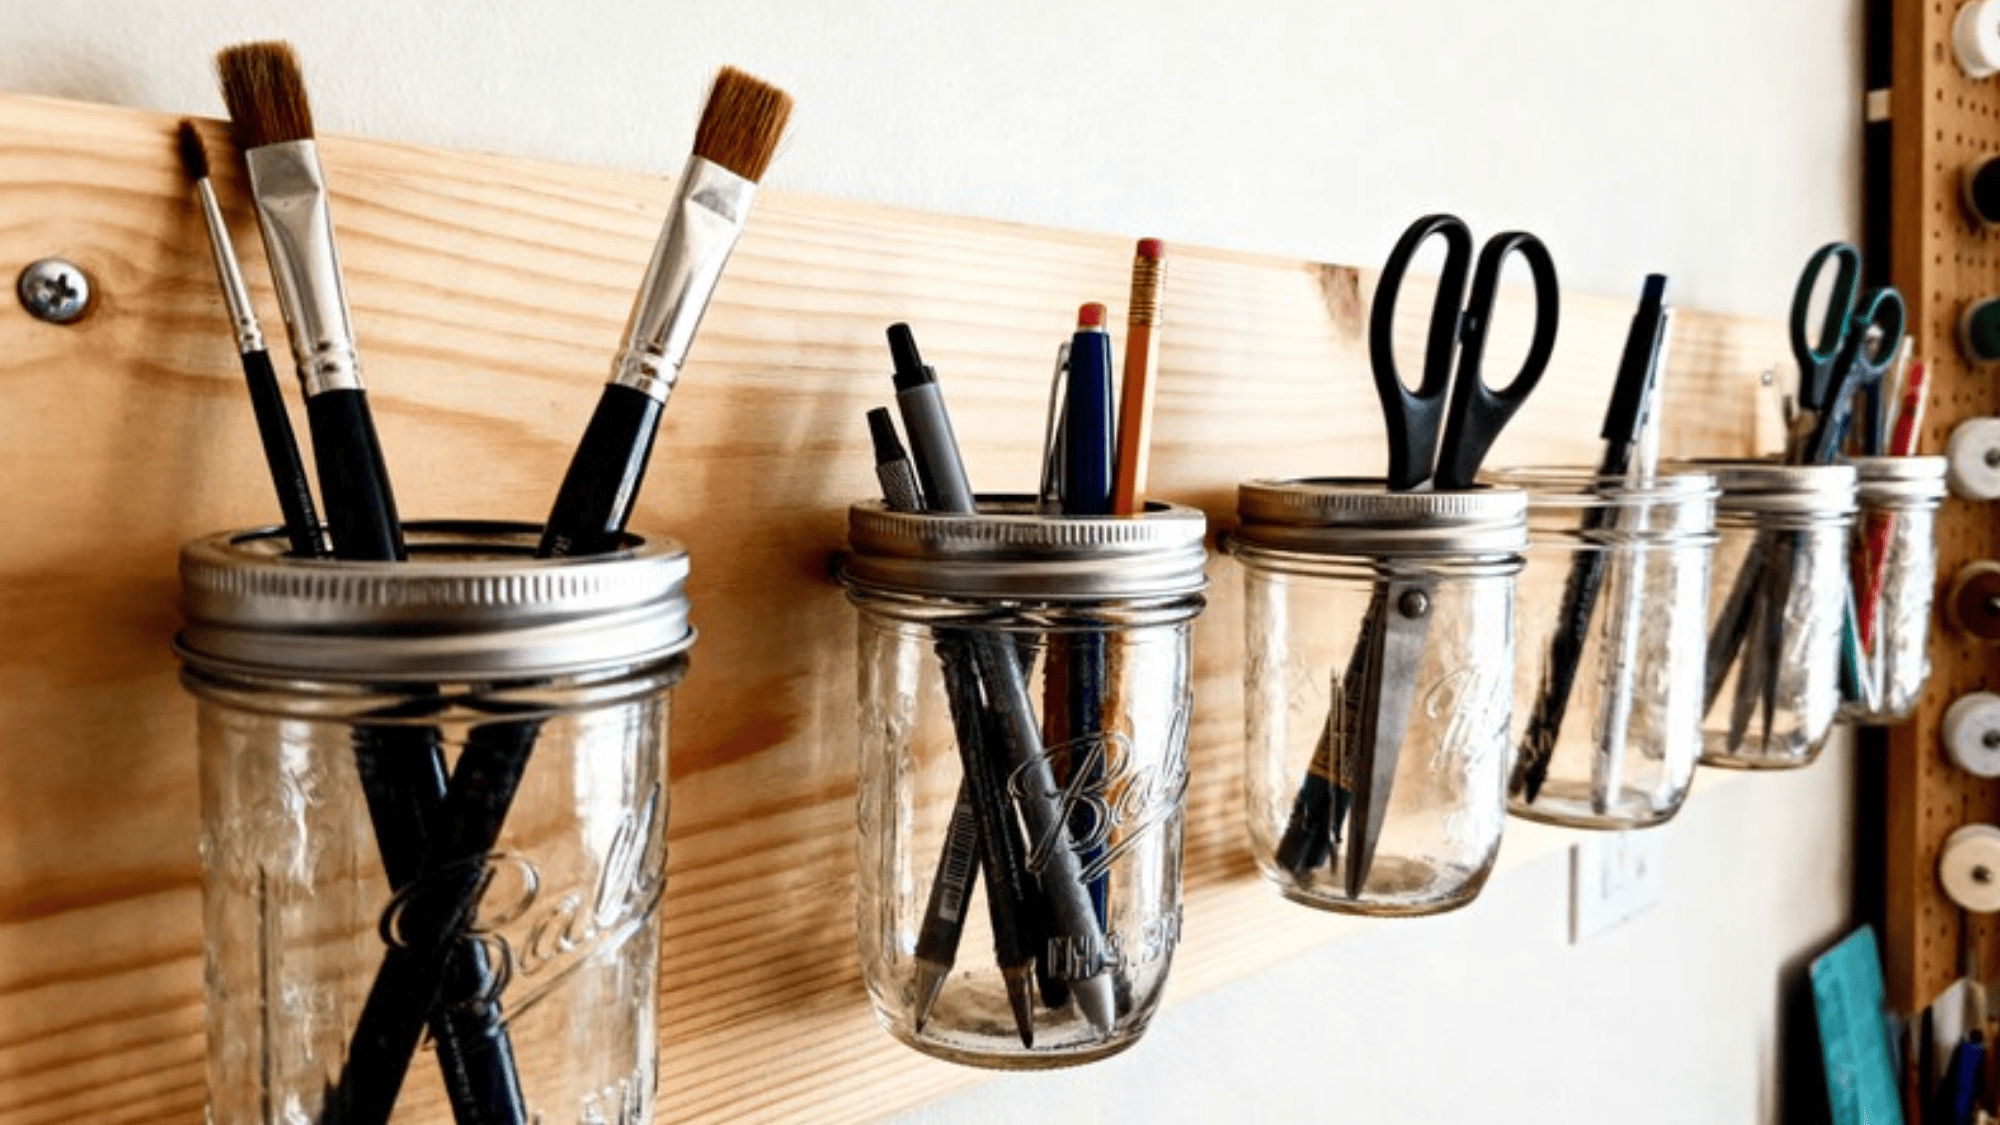
- What it is: A row of mason jars mounted on a wooden board and fixed to the wall, used to hold brushes, pens, scissors, and other slim tools.
- Budget-friendly: Very budget-friendly, mason jars are cheap, and a scrap piece of wood is all you need for the base.
- DIY steps: Sand and paint a wooden board, then attach hose clamps or pipe clamps at even intervals. Screw the clamps into the board, slide mason jars into each one, and mount the whole unit on the wall.
11. Organized Crafting Cart with Drawers
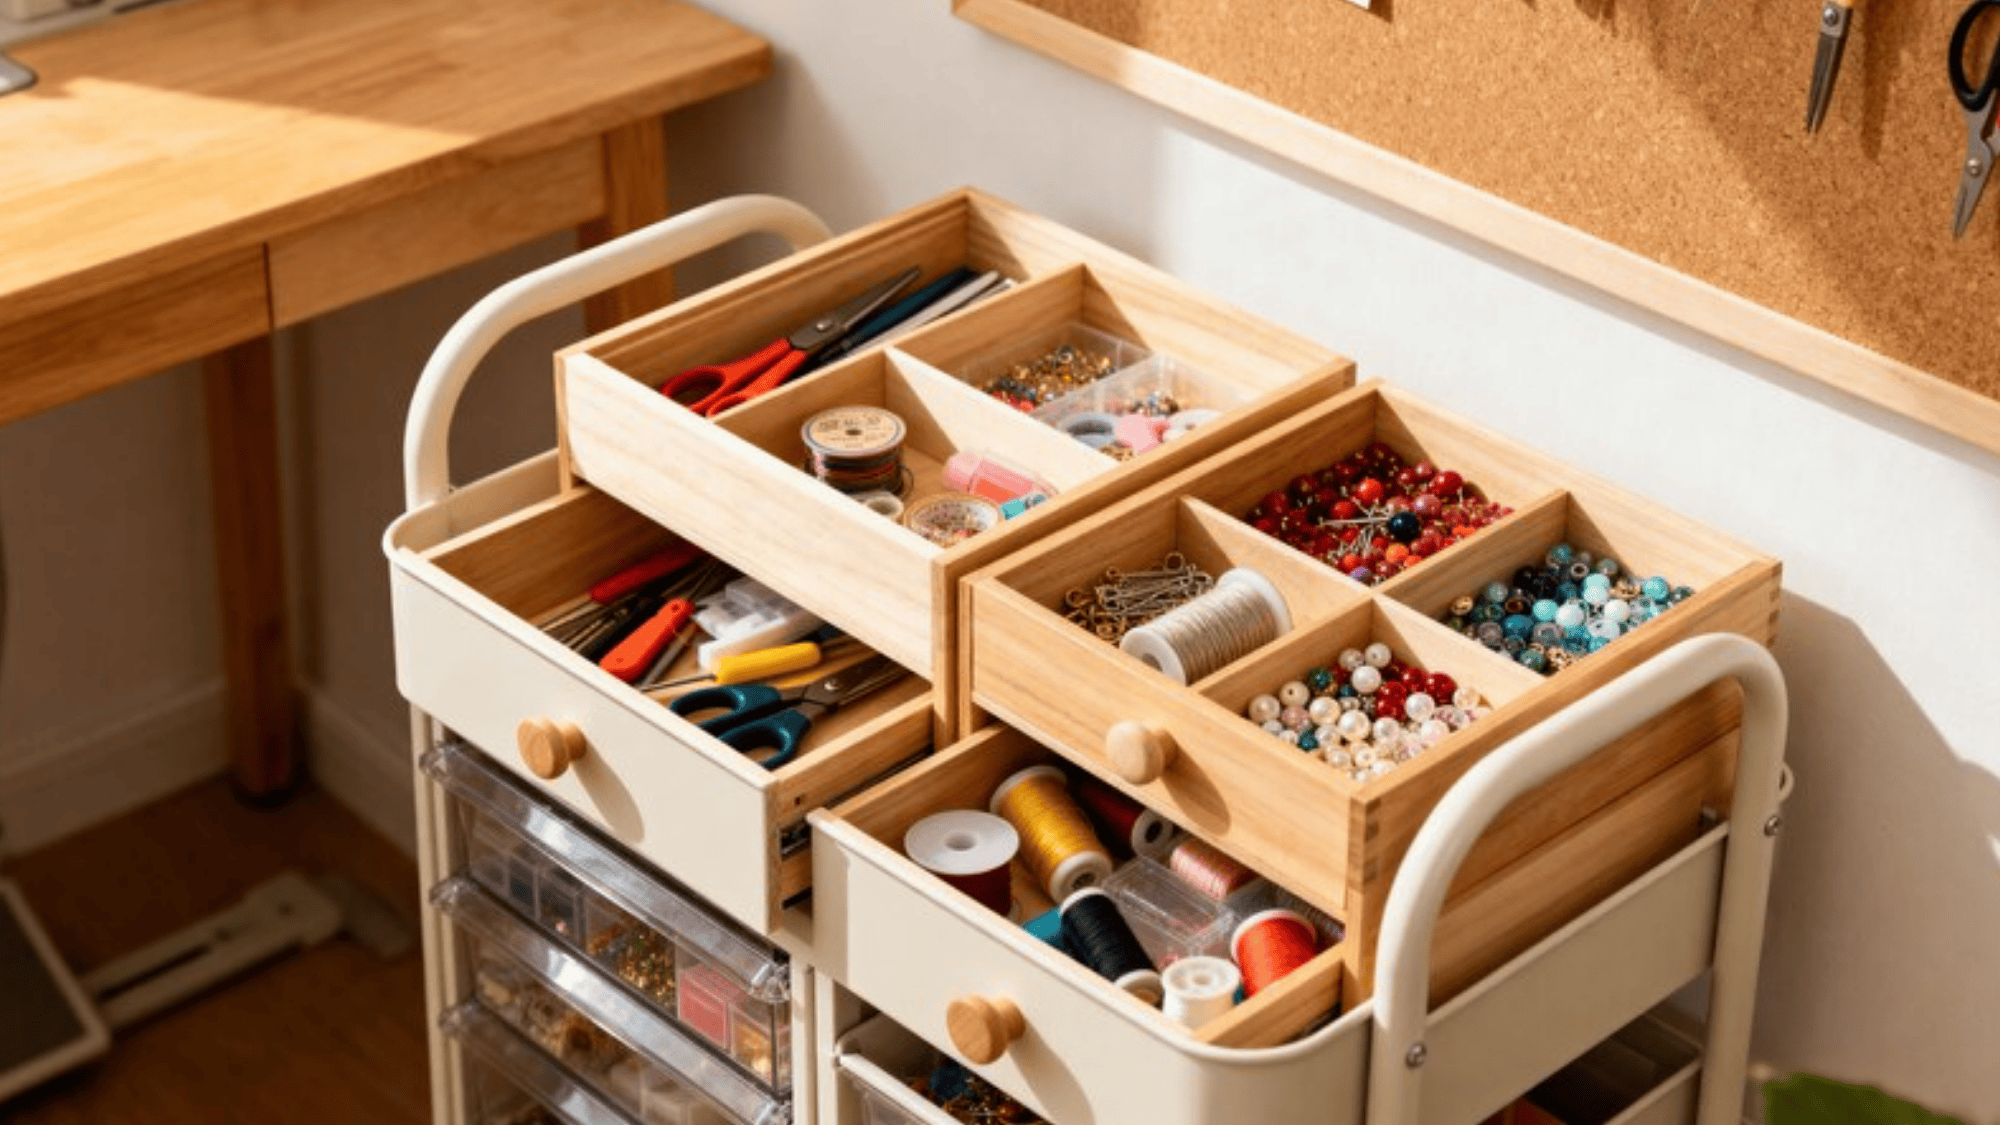
- What it is: A compact cart with multiple drawers designed to hold small tools, thread, beads, and other tiny supplies in one tidy unit.
- Budget-friendly: Very budget-friendly, drawer carts are available at most stores for under $30.
- DIY steps: Assemble the cart per the instructions, sort supplies into drawers by category, and add labels to each drawer front. Slide the cart under your desk when not in use to save space.
12. Repurposed Wine Racks for Ribbon Storage
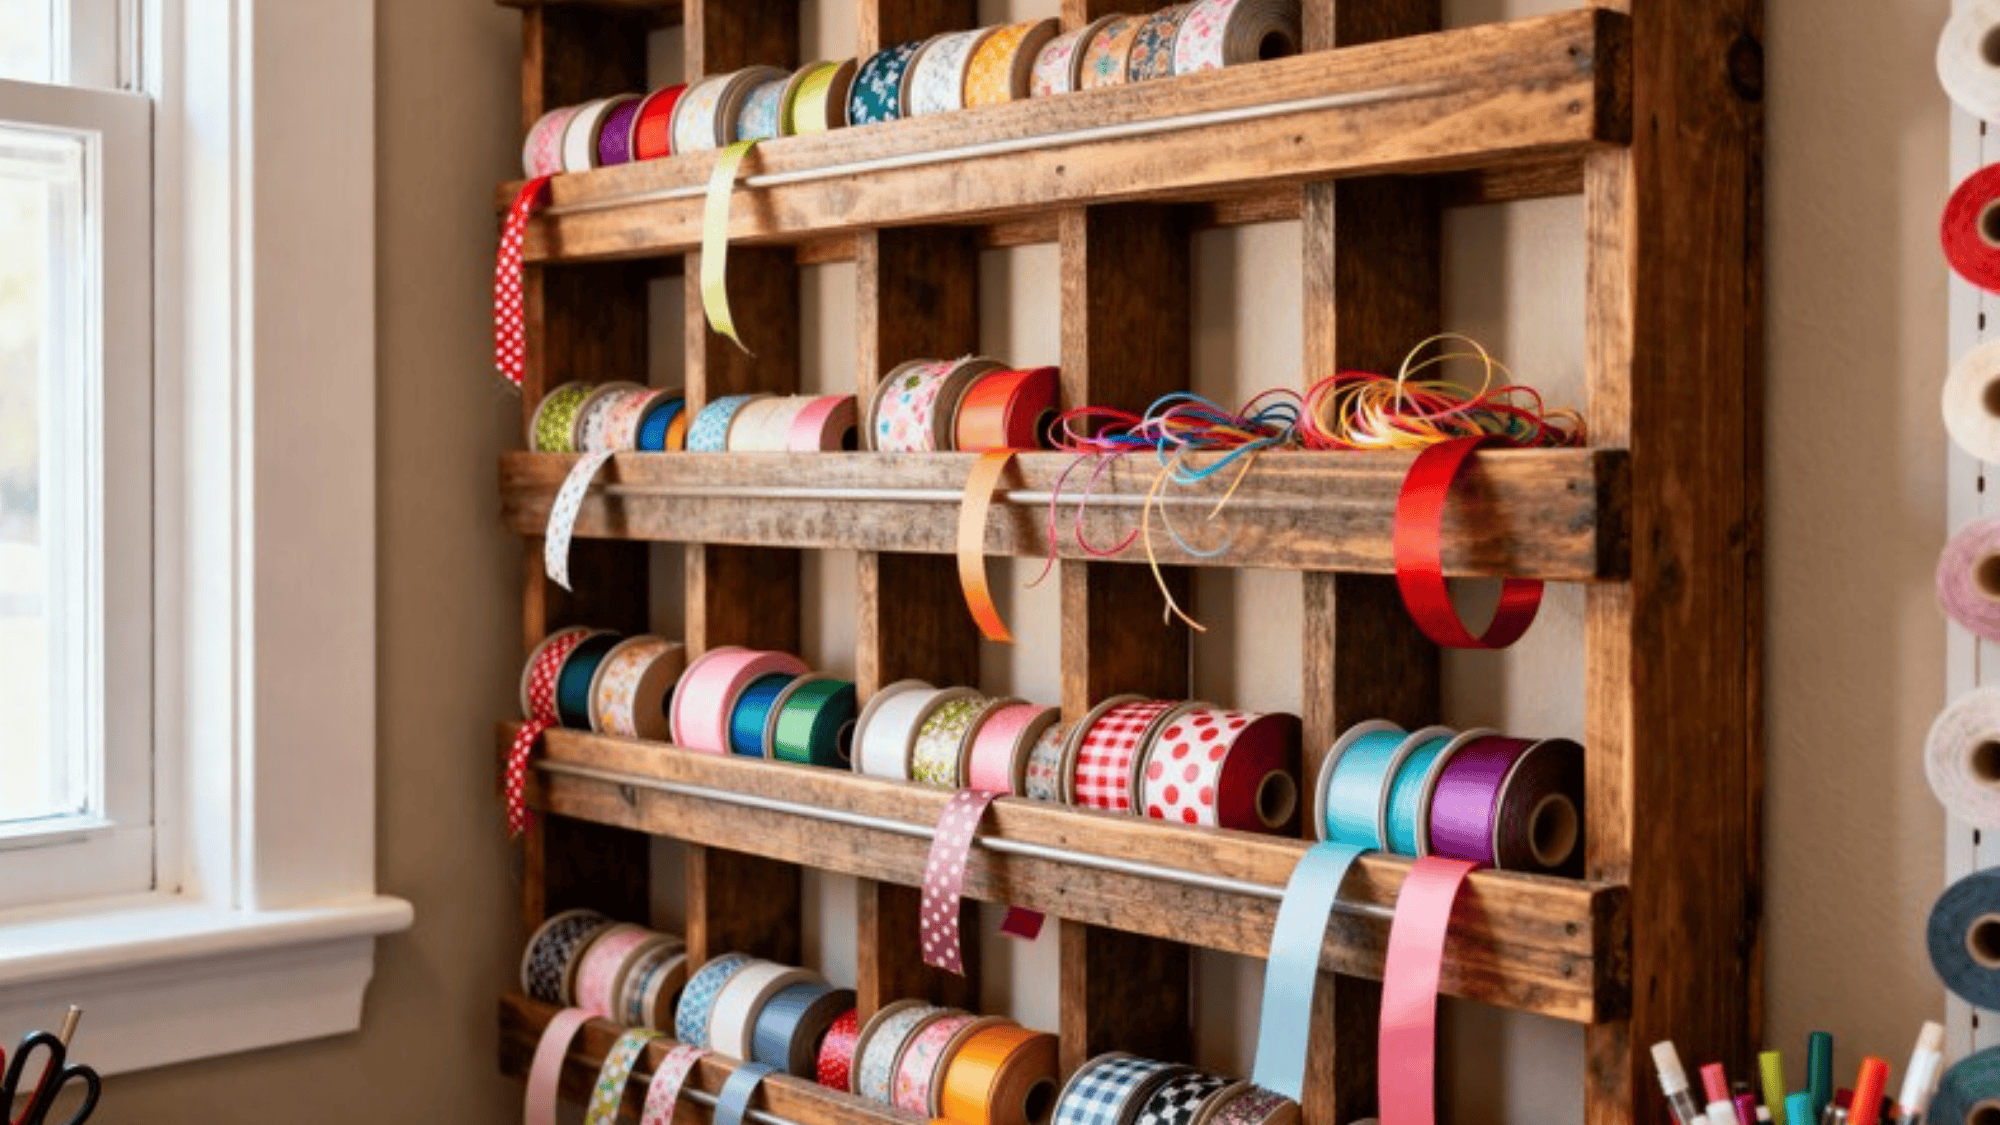
- What it is: A wine rack repurposed to hold rolls of ribbon, keeping them organized, visible, and tangle-free.
- Budget-friendly: Very budget-friendly, thrift store wine racks work perfectly and often cost just a few dollars.
- DIY steps: Clean the wine rack, then spray paint it for a fresh look. Slide the ribbon rolls into each slot the same way a wine bottle would sit. Mount it on a wall or place it on a shelf to save counter space.
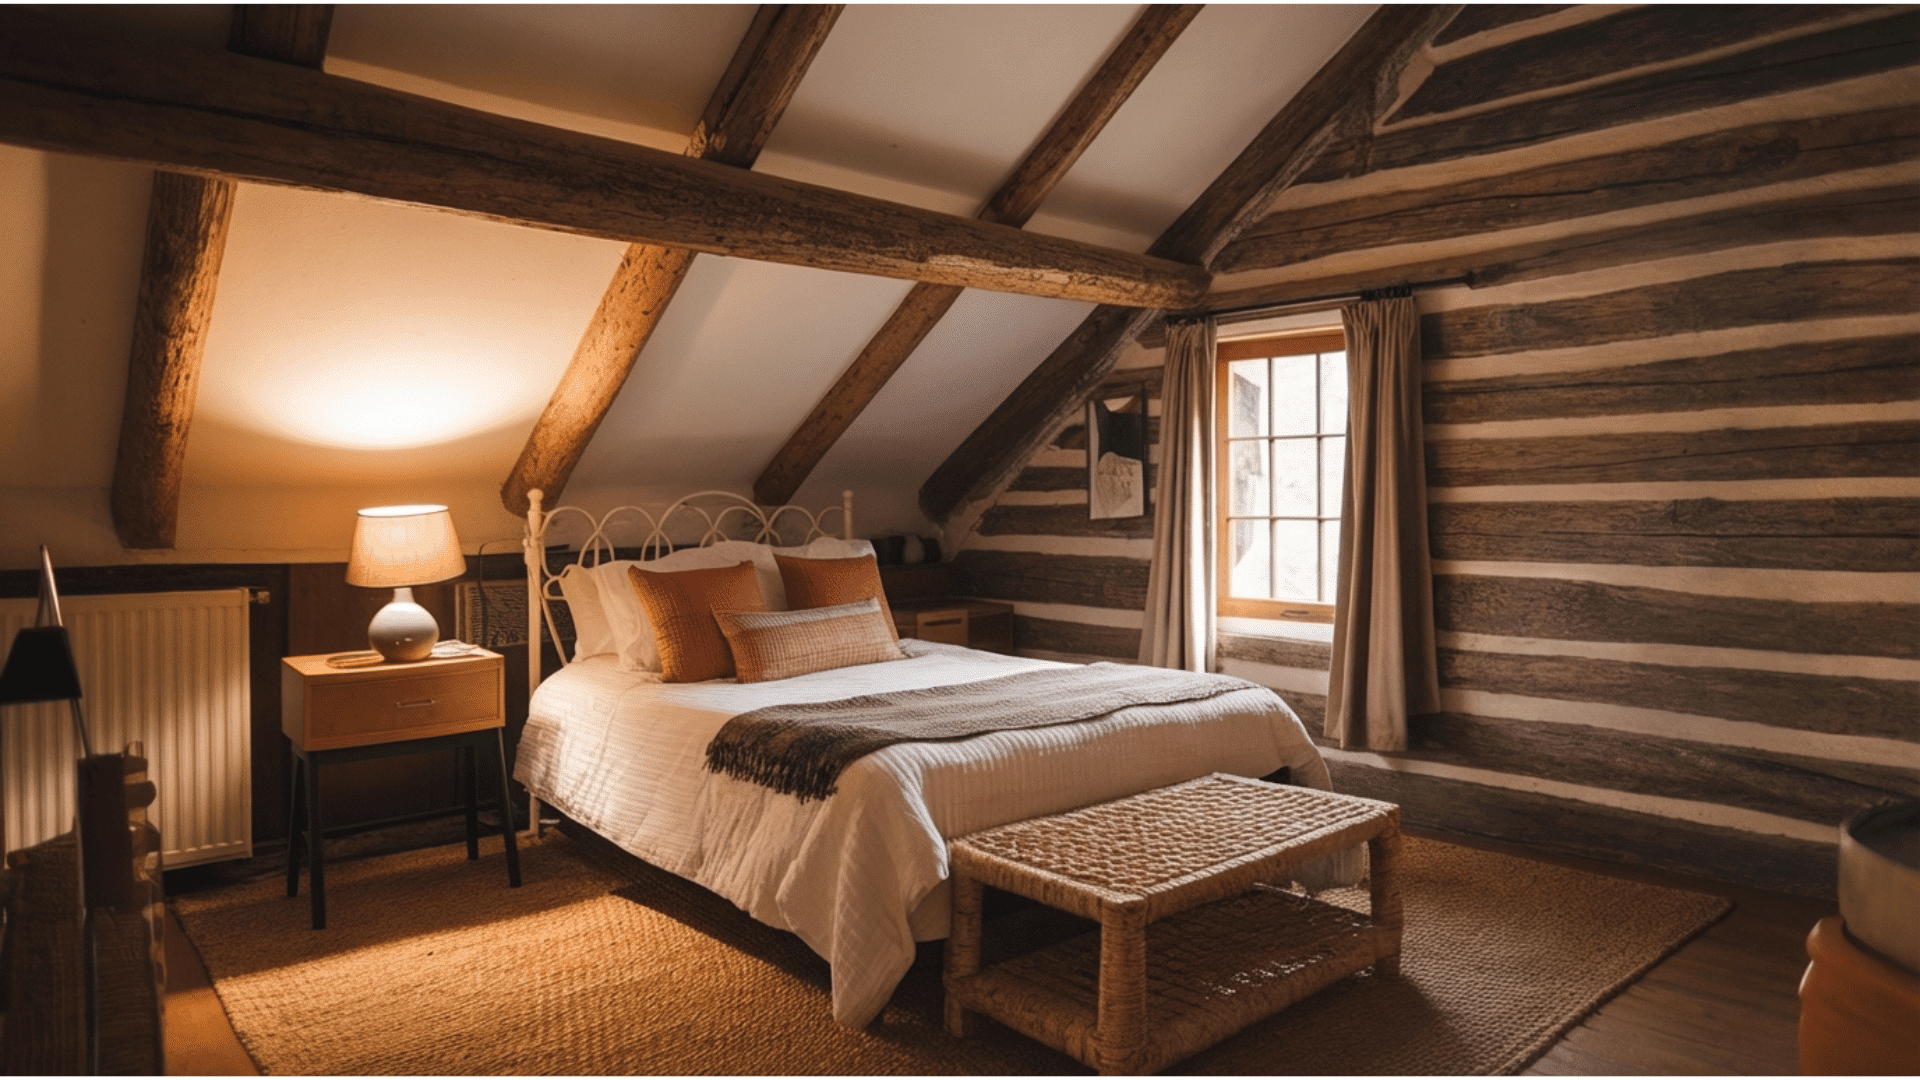
Furniture & Workspace Ideas
The right furniture doesn’t have to be expensive or brand new; it just needs to work well for your specific needs. These ideas cover everything from building your own desk to giving old pieces a completely new purpose.
13. Multi-Purpose Furniture
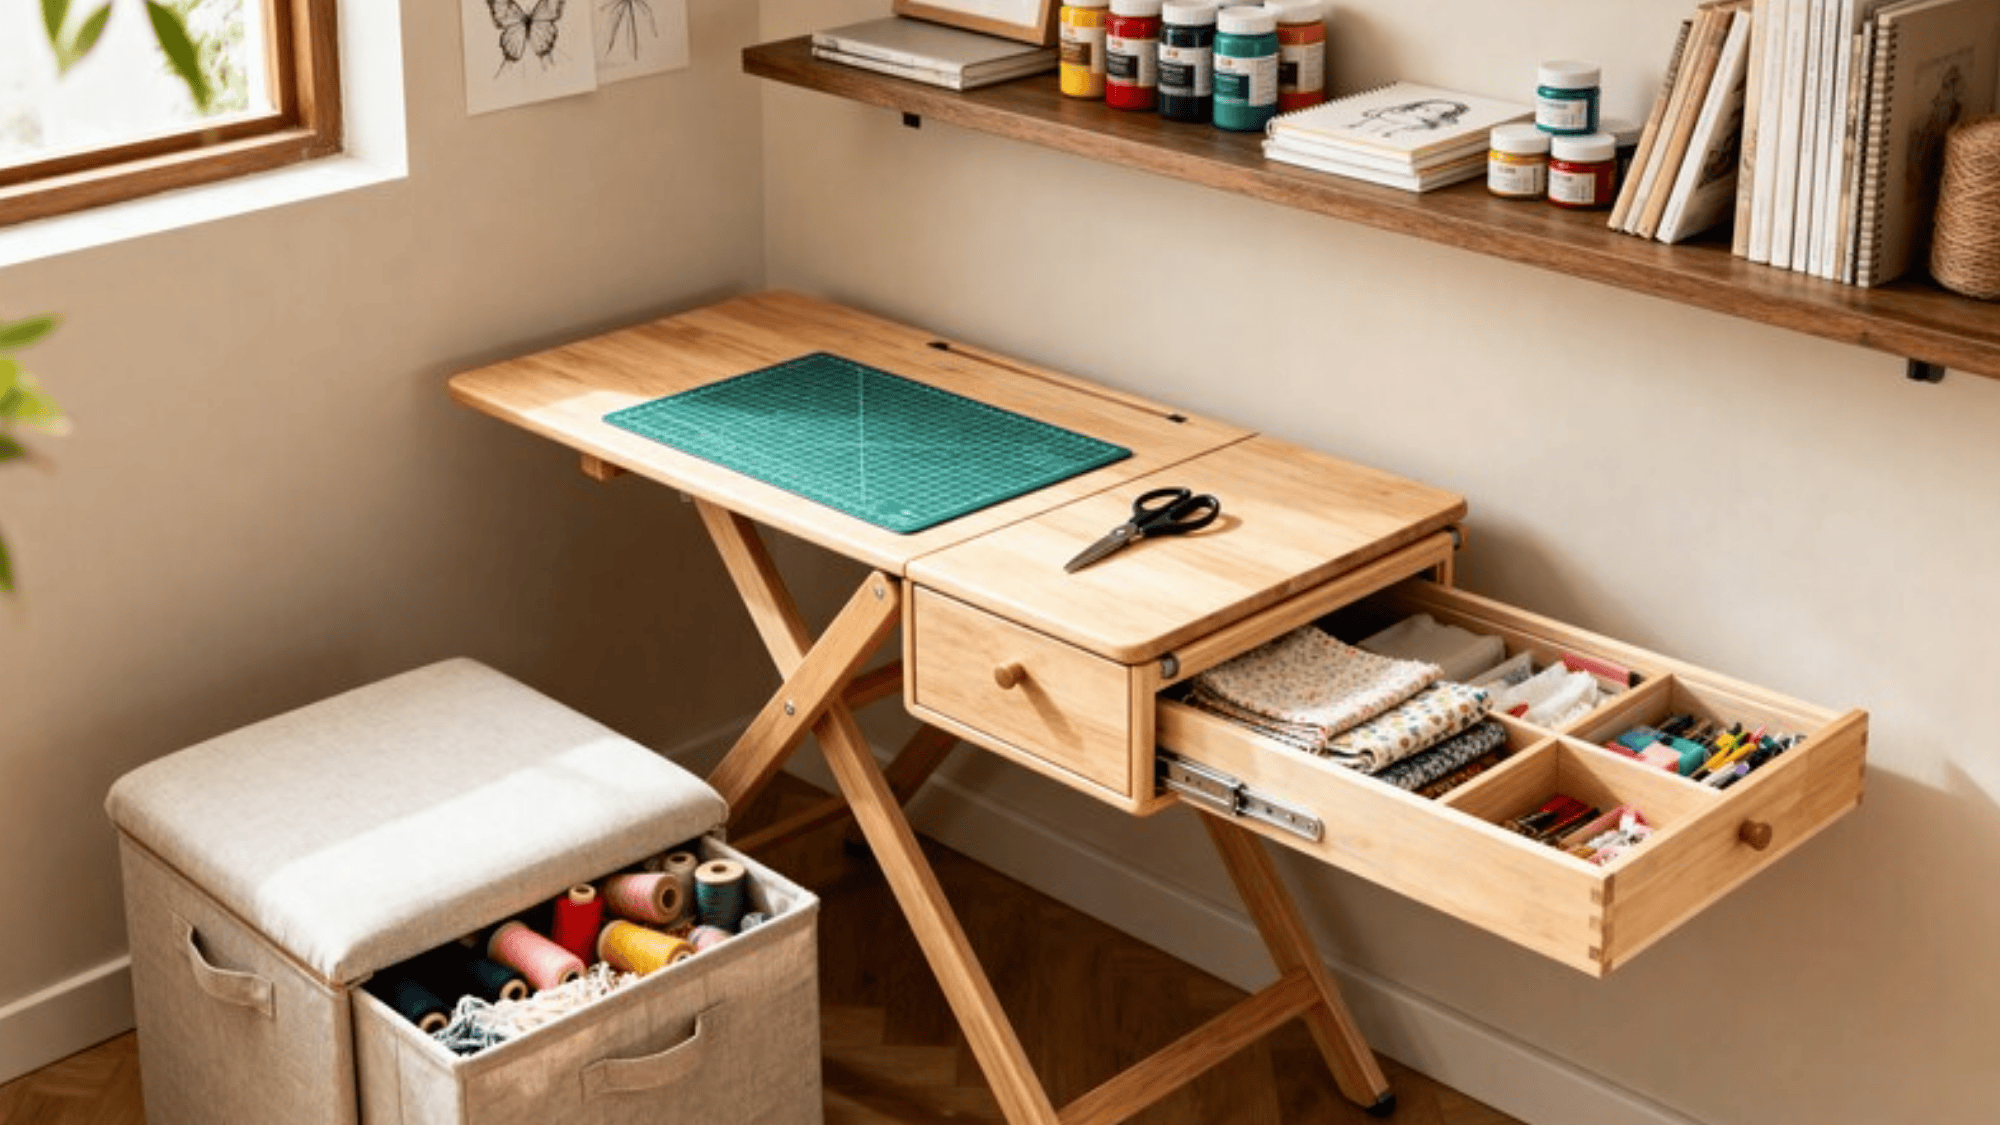
- What it is: Furniture that serves more than one function, like a fold-out table that doubles as a desk or a storage ottoman that holds supplies.
- Budget-friendly: Moderately budget-friendly, fold-out tables are widely available at affordable prices, and some can be built from scratch.
- DIY steps: Mount a fold-down table bracket to the wall, attach a cut-to-size wooden board, and secure with a supporting chain or leg. Fold it up when not in use to save space.
14. Custom Crafting Desks
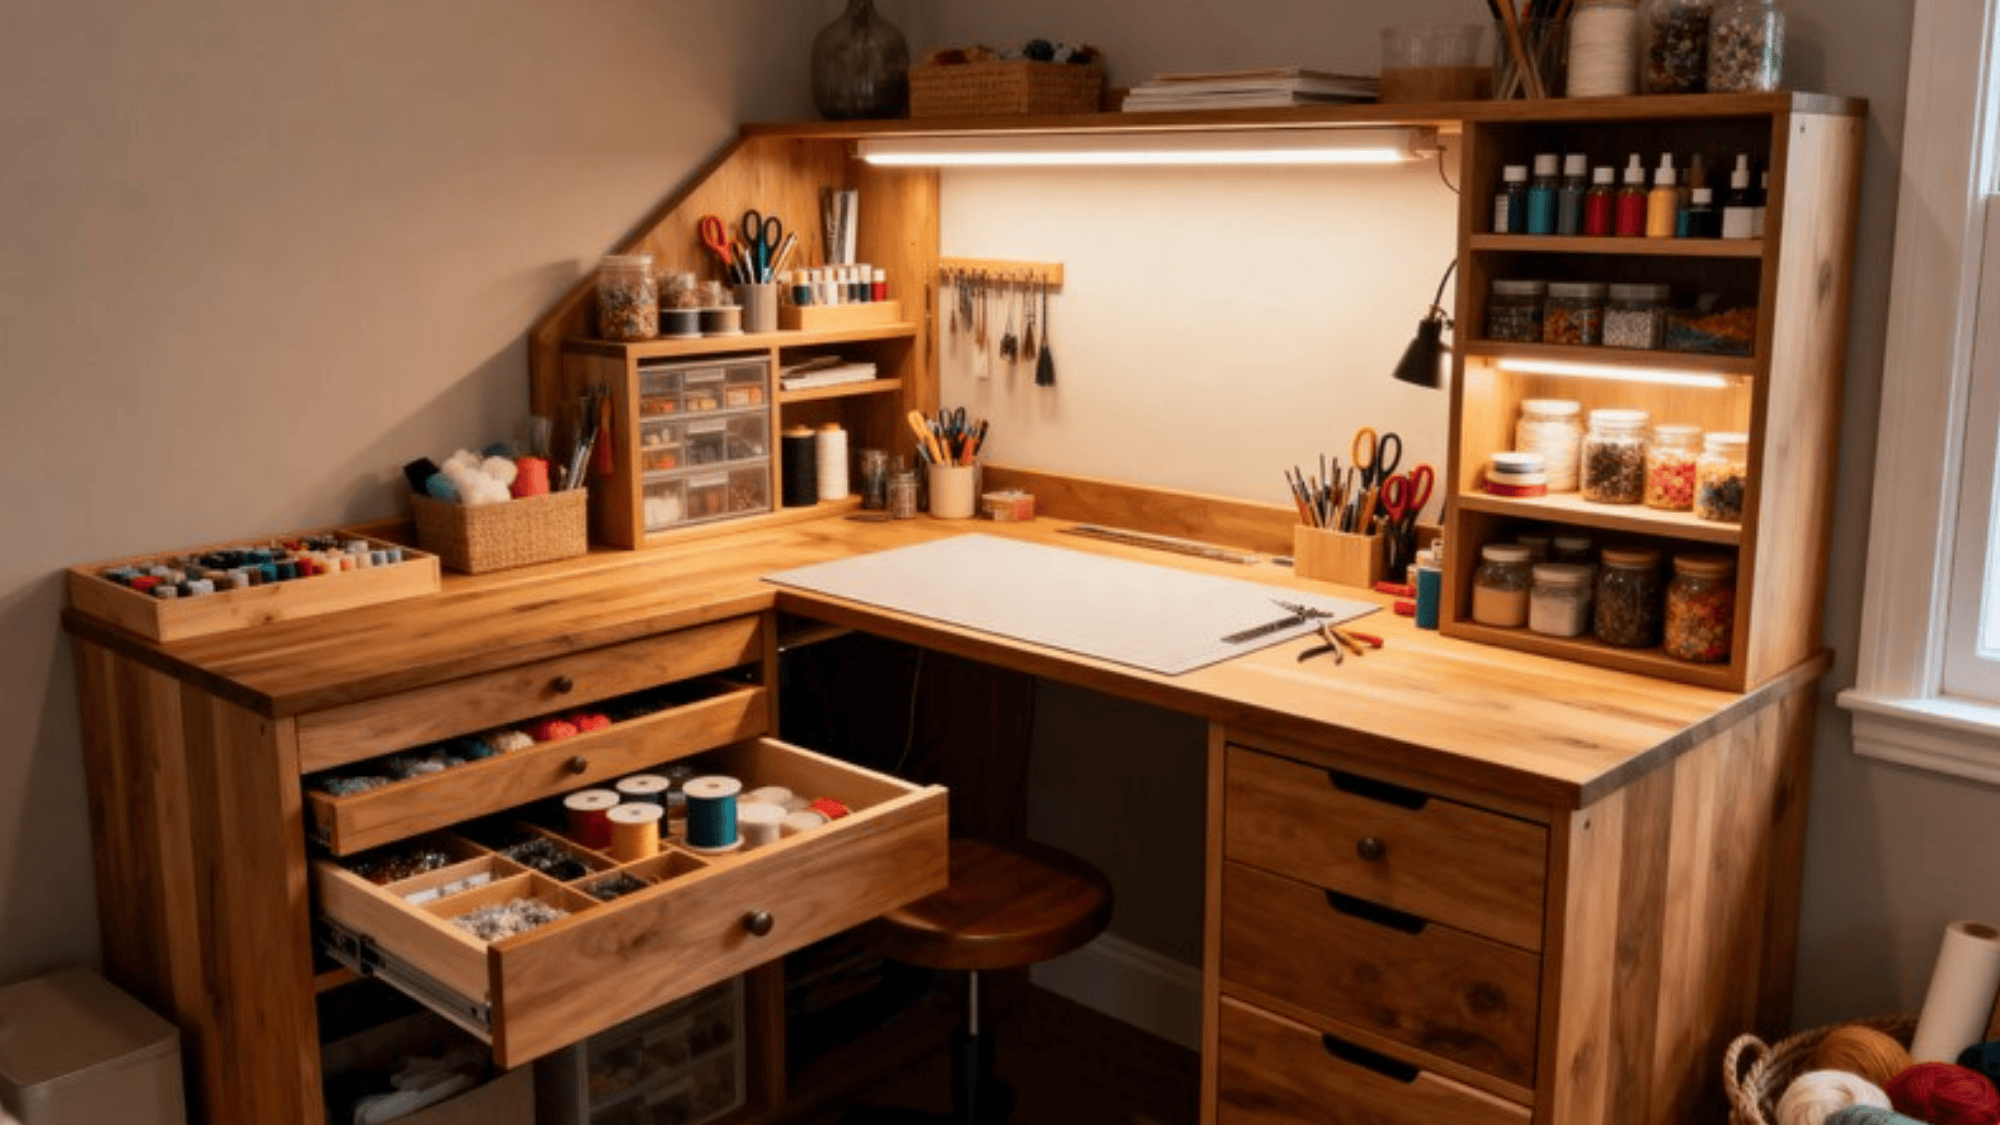
- What it is: A desk built to fit your exact space and crafting needs, rather than settling for a standard size that doesn’t quite work.
- Budget-friendly: Moderately budget-friendly, building your own can be cheaper than buying a specialty desk, especially if you use affordable lumber.
- DIY steps: Measure your space, cut the tabletop and legs to size, sand all surfaces, and assemble using wood screws and brackets. Finish with paint or wood stain and add drawers or shelves underneath if needed.
15. Compact Desk with Hidden Storage
- What it is: A small desk with built-in drawers, cubbies, or a lift-top compartment to keep supplies out of sight but close at hand.
- Budget-friendly: Budget-friendly, many affordable desks already come with built-in storage, or you can add it yourself.
- DIY steps: If building your own, construct a basic desk frame with lumber, add drawer boxes using simple box joints, and install drawer slides. Sand, paint, and attach handles to finish.
16. Repurpose Old Furniture
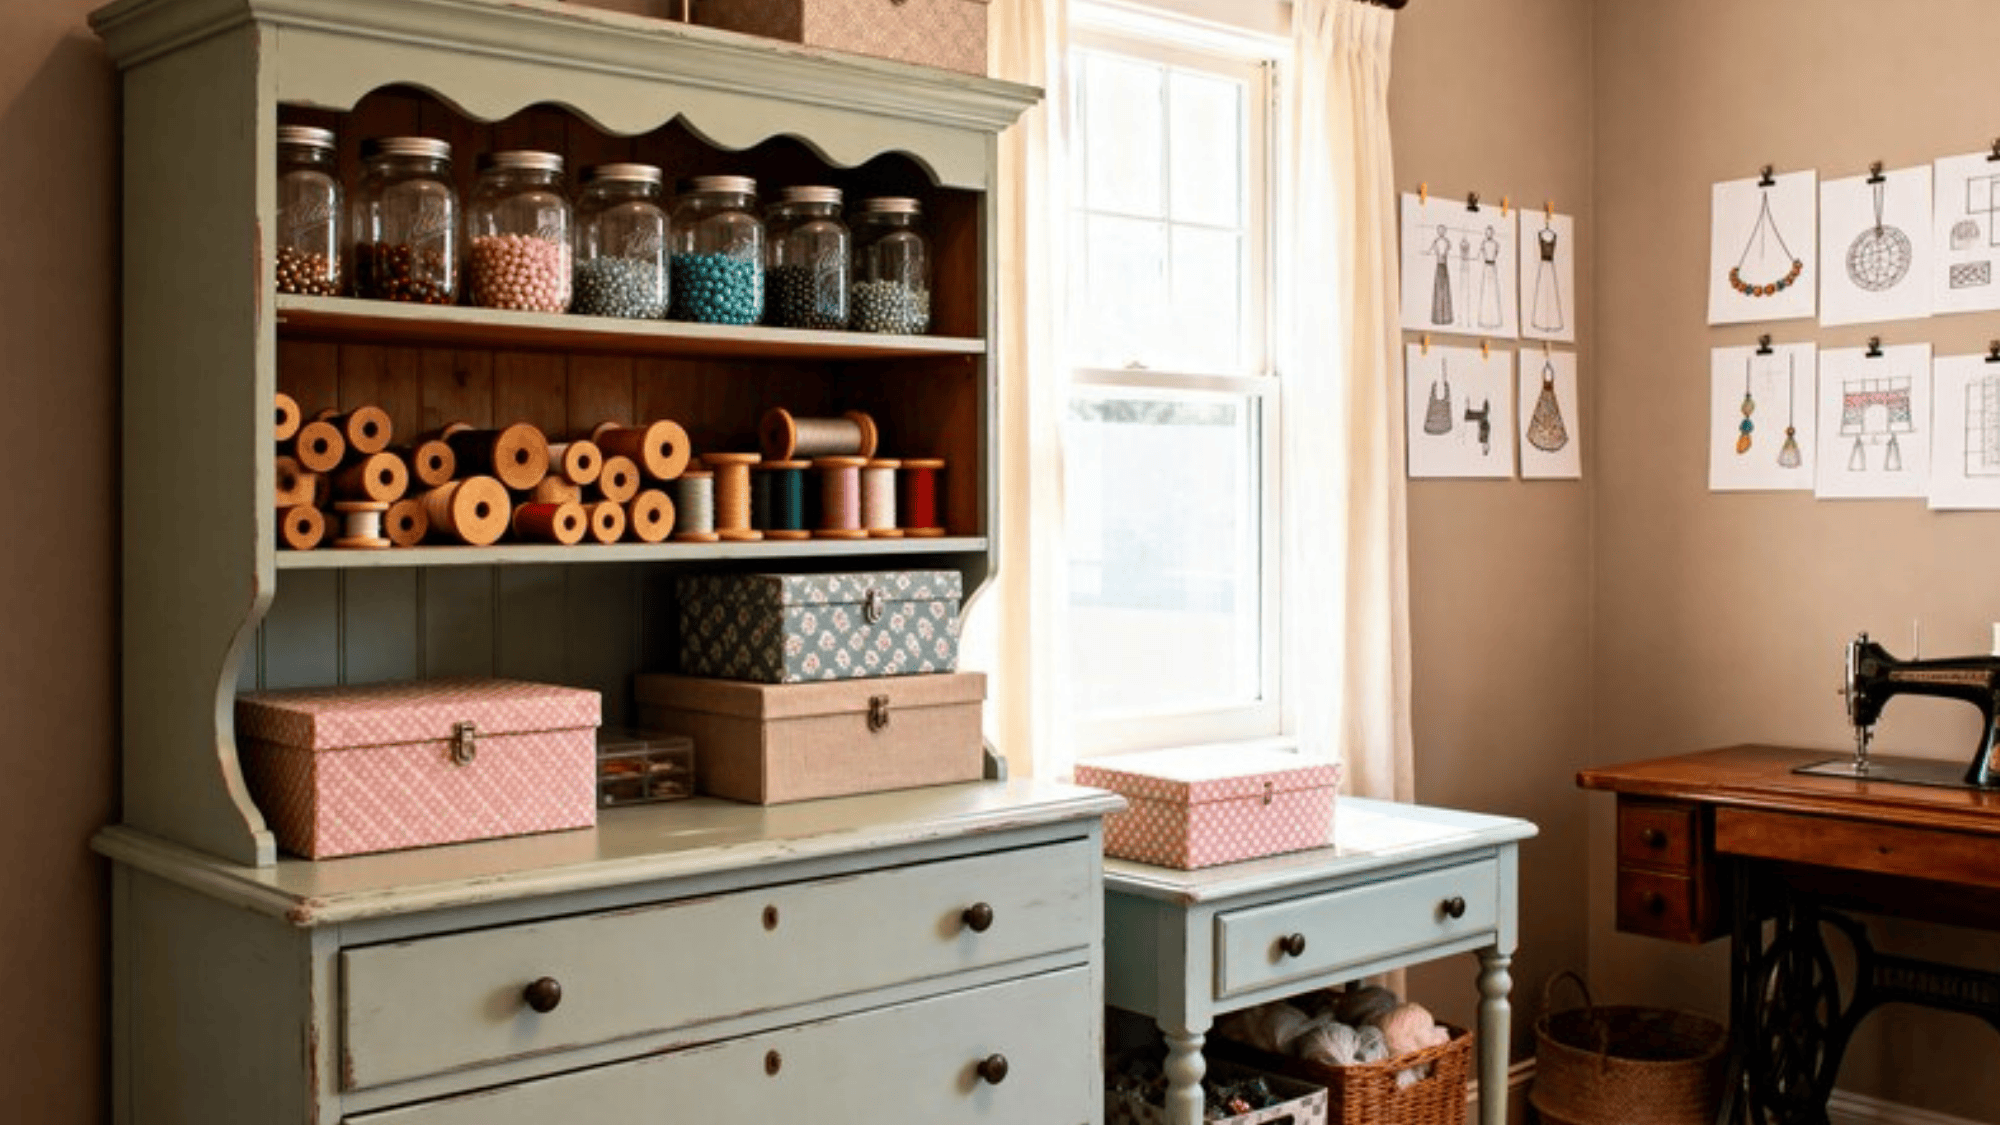
- What it is: Old cabinets, dressers, or side tables given a second life as craft storage units.
- Budget-friendly: Extremely budget-friendly, if you already have old furniture at home, this costs next to nothing. Thrift store finds work just as well.
- DIY steps: Clean and sand the piece, apply a fresh coat of paint, and add new knobs or pulls if needed. Line the drawers with craft paper and sort your supplies by category.
17. Upcycled Furniture for Extra Storage
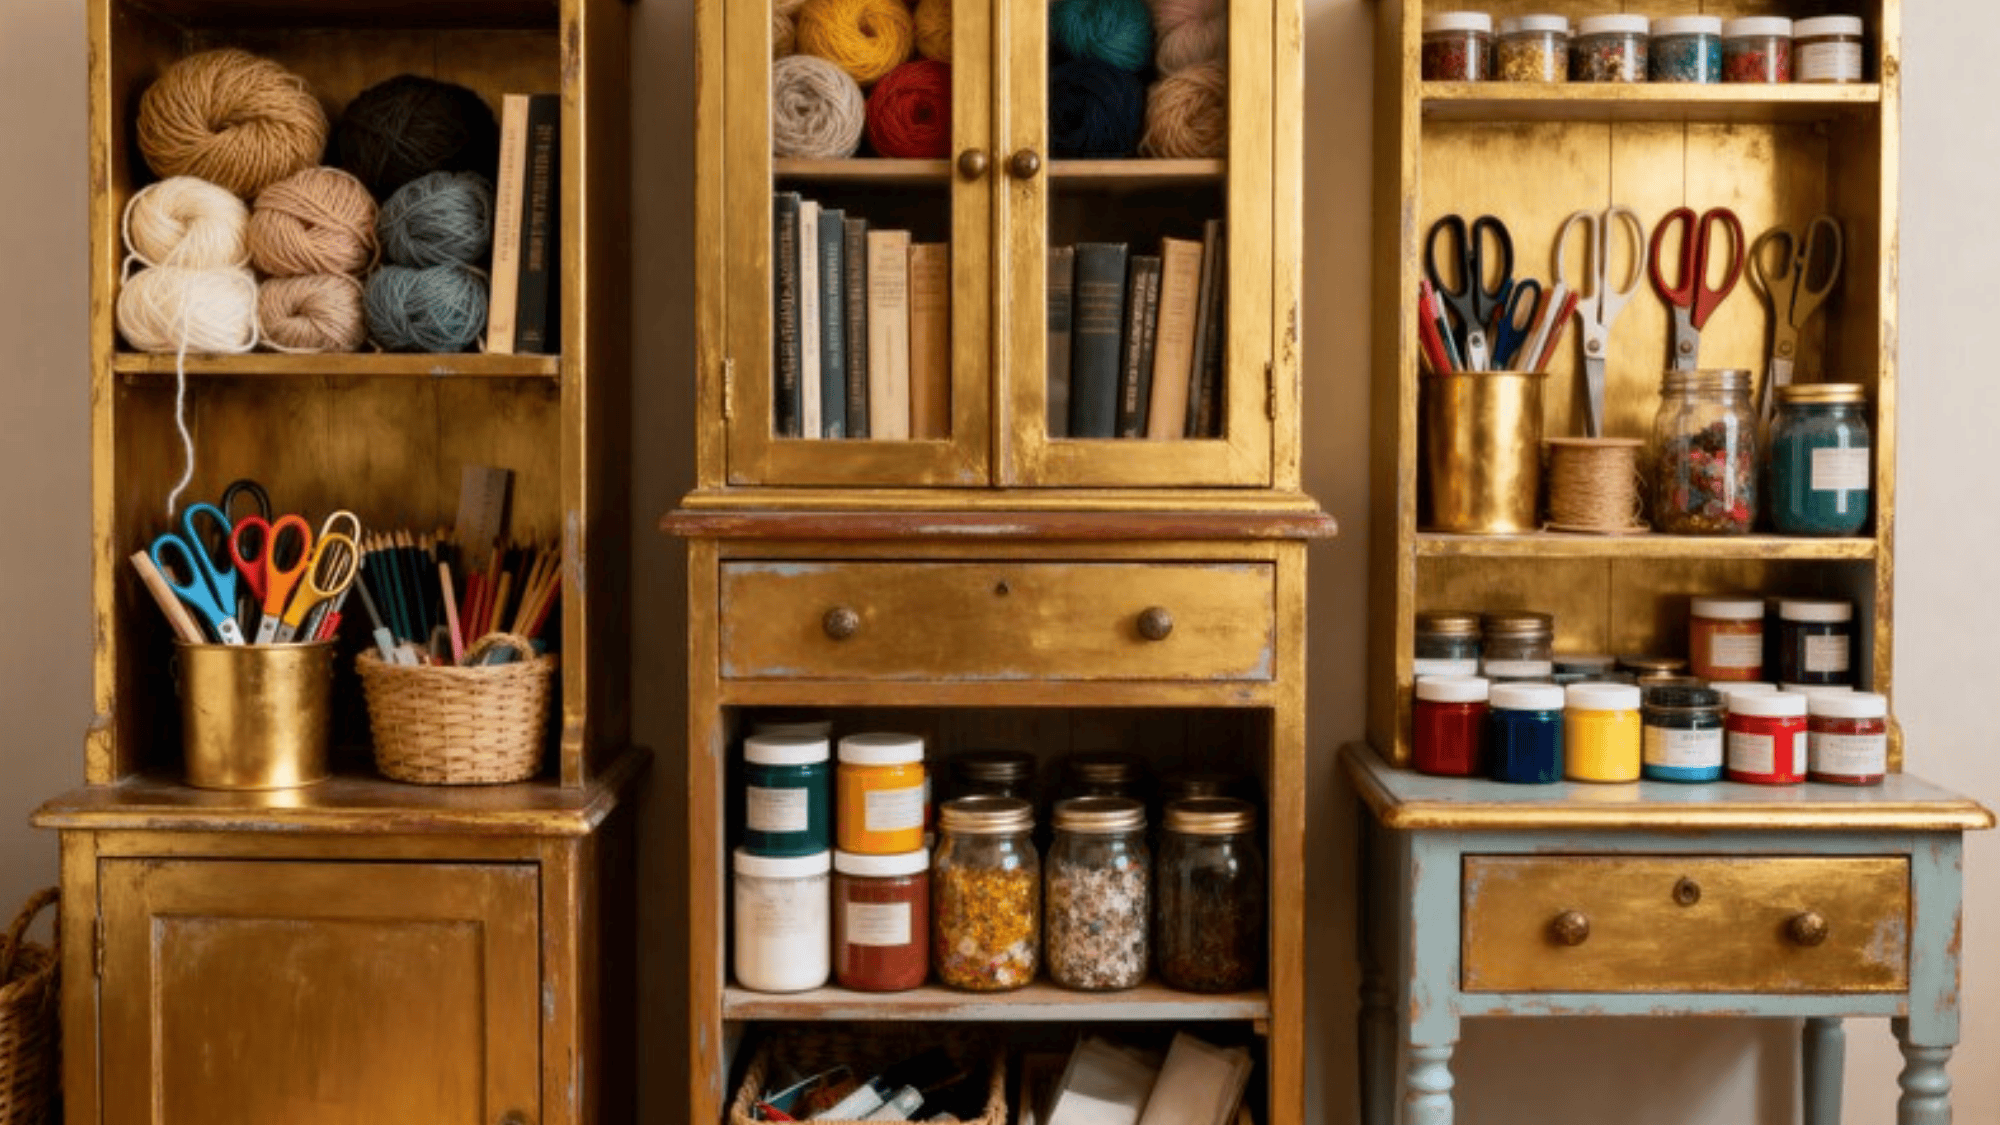
- What it is: Old bookcases, cabinets, or side tables brought back into use specifically for storing craft supplies.
- Budget-friendly: Very budget-friendly, upcycling costs little to nothing if you’re working with pieces you already own.
- DIY steps: Clean and sand the piece, apply fresh paint or stain, and add new hardware if needed. Organize the interior with bins or dividers and assign each section to a specific type of supply.
18. Make Your Own Crafting Chair
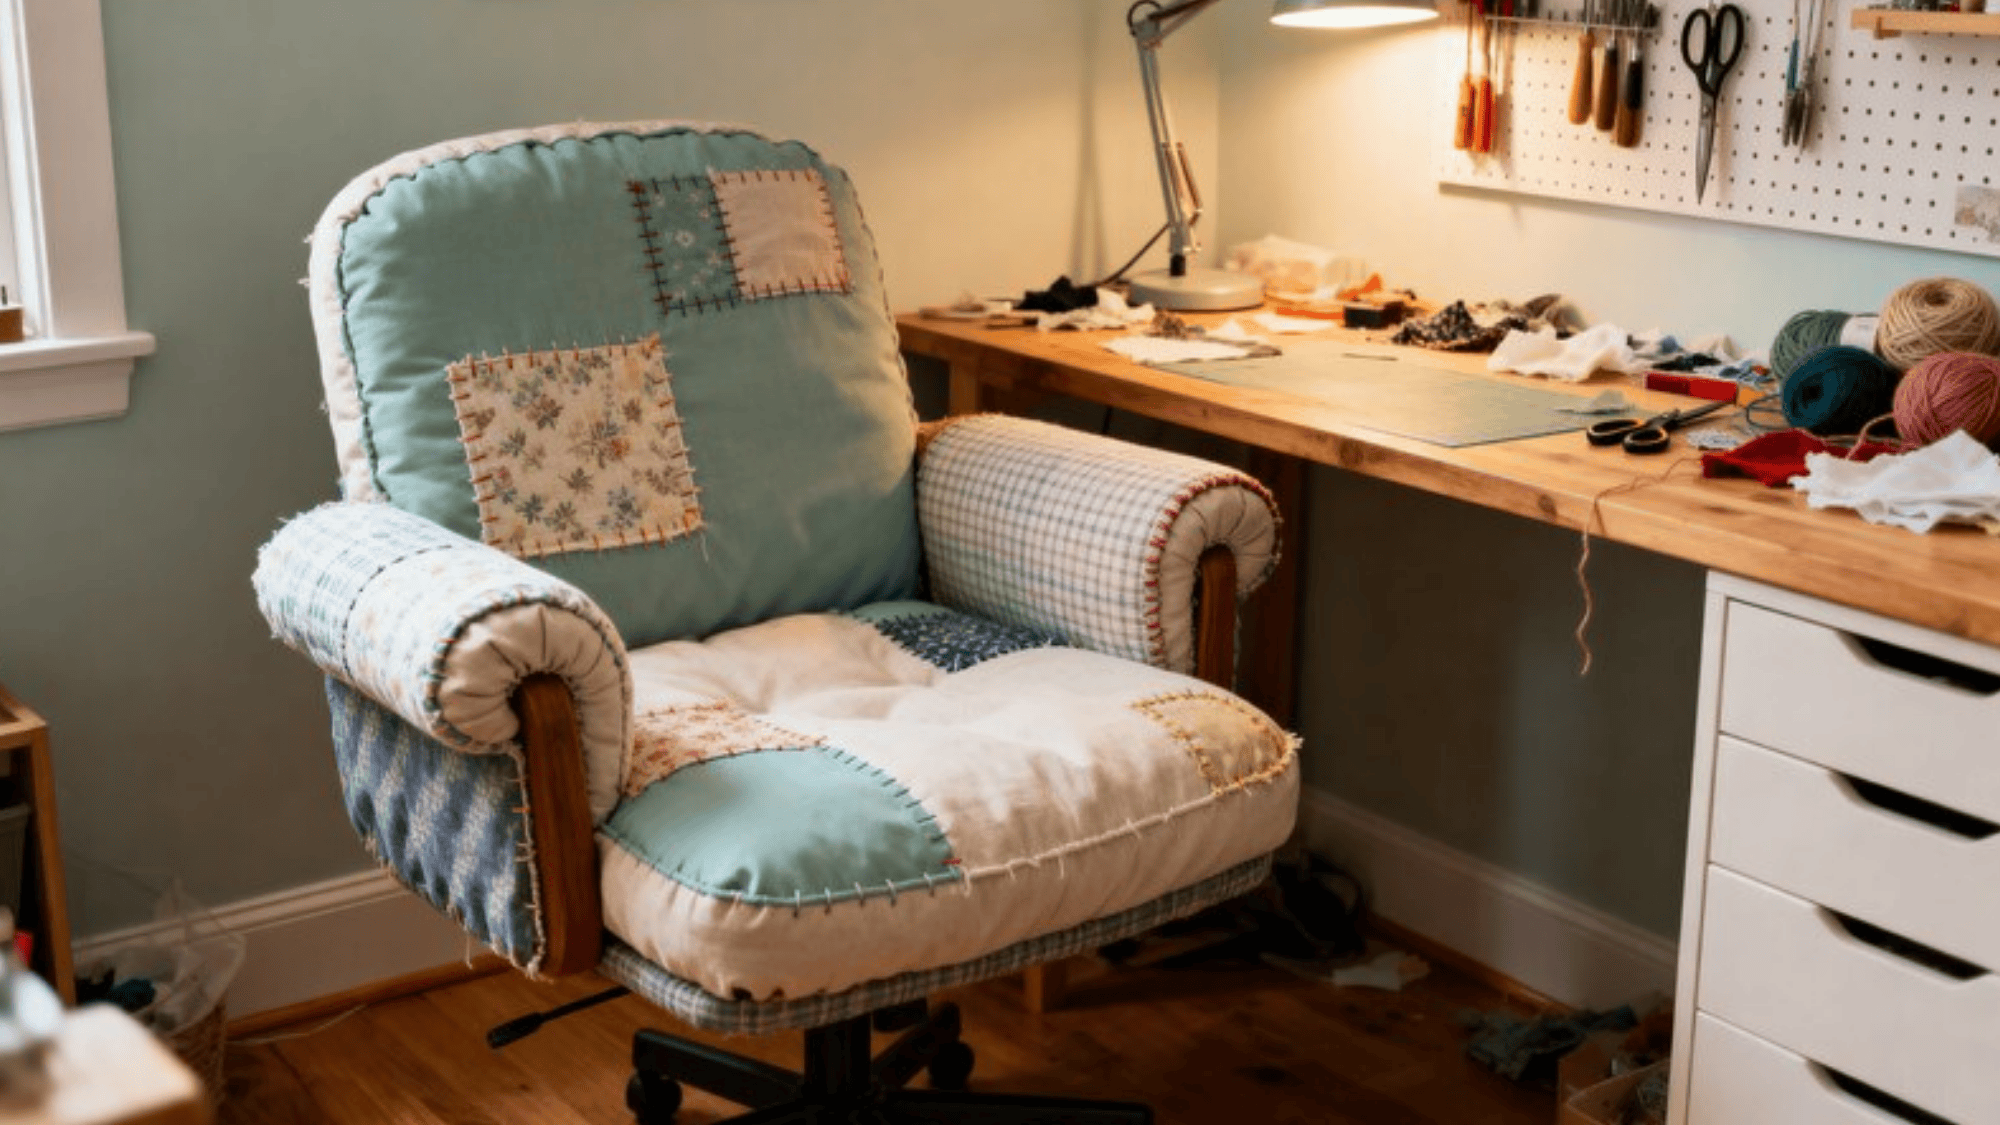
- What it is: A customized chair built or modified to be comfortable for long crafting sessions, with added features like armrests or a cushioned seat.
- Budget-friendly: Budget-friendly, modifying an existing chair costs very little, and building a basic one from scratch is manageable with basic tools.
- DIY steps: Start with a basic chair frame or an old chair you already have. Add foam padding to the seat and secure it with fabric using a staple gun. Reinforce any wobbly joints with wood glue and screws for extra stability.
19. Repurposed Ladder Shelf for Craft Storage
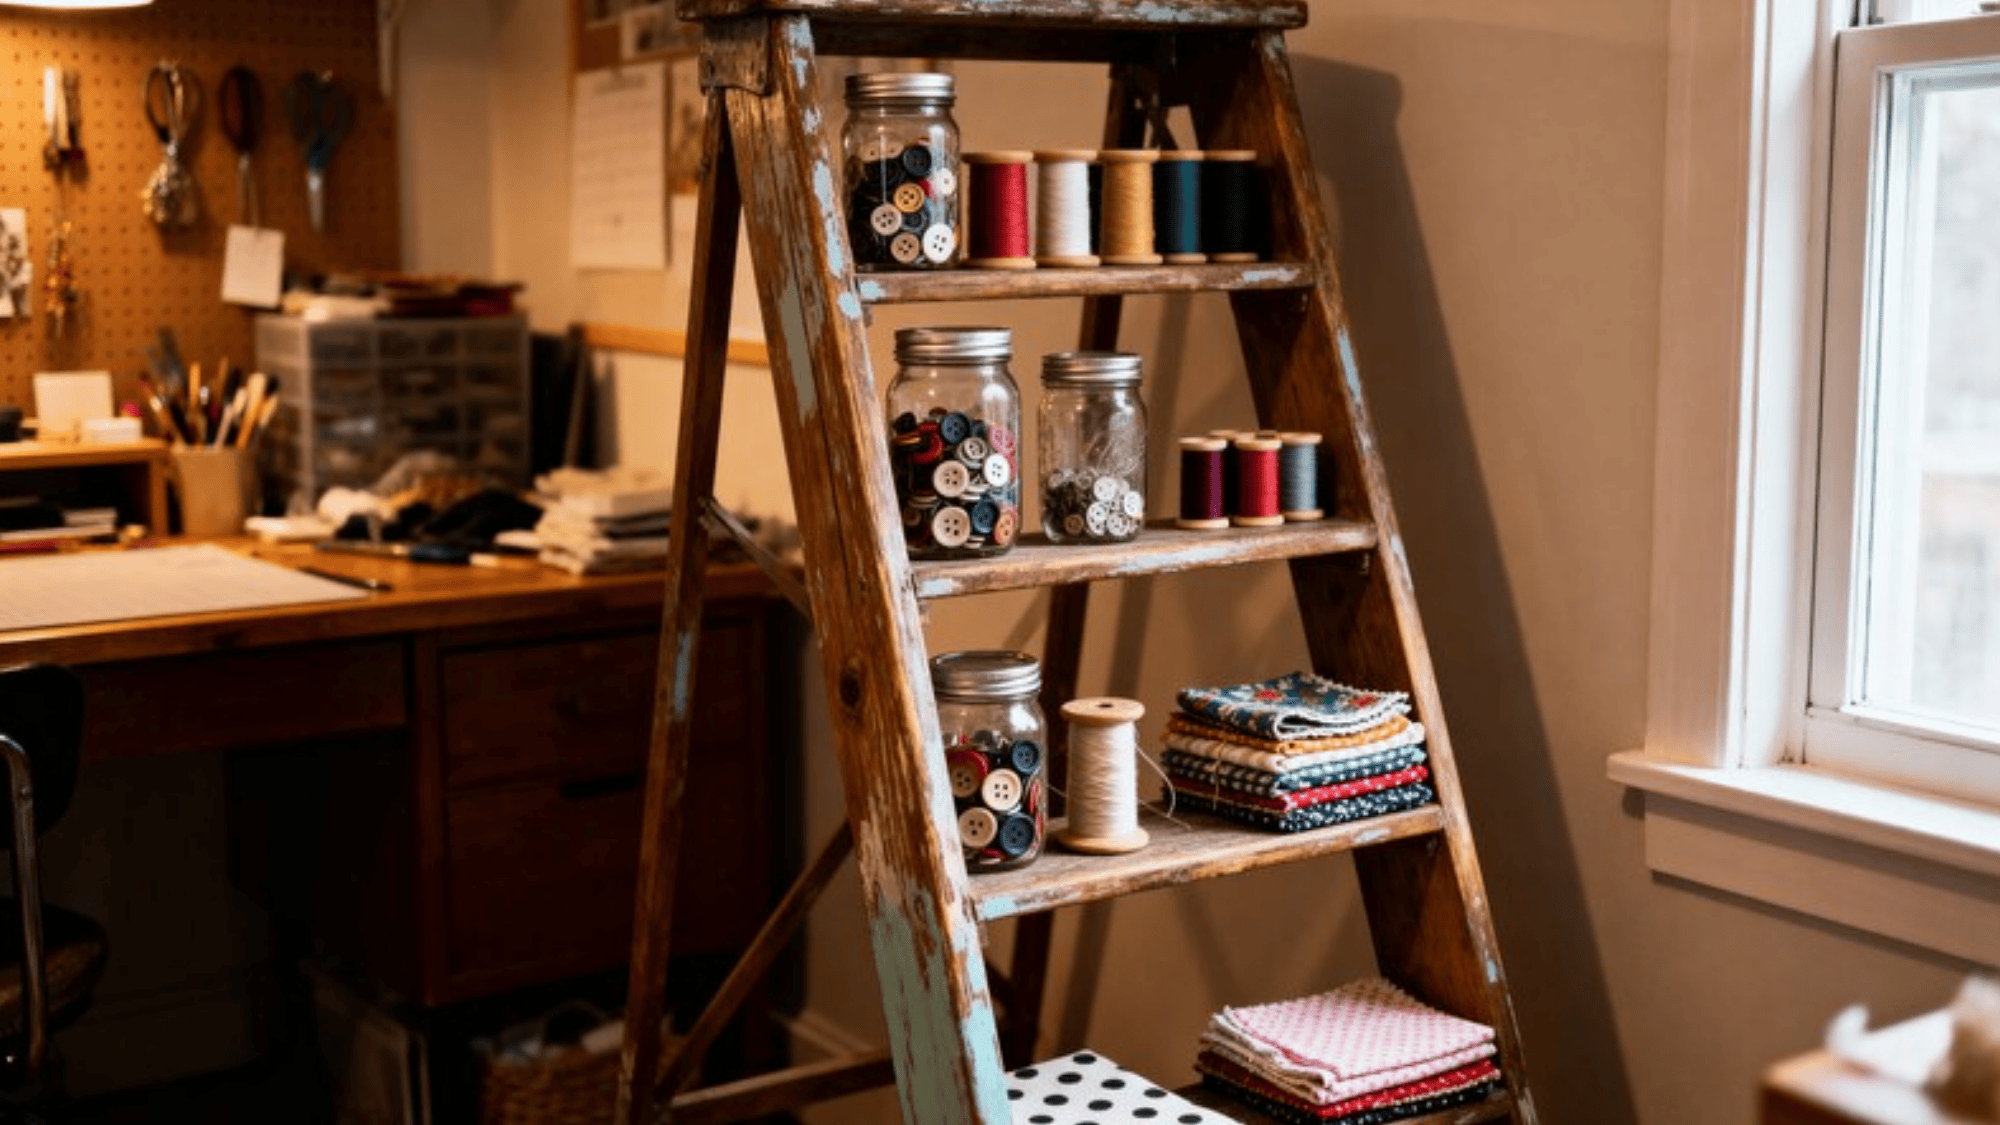
- What it is: An old wooden ladder stood upright and was used as a leaning shelf to display and store craft supplies on its rungs.
- Budget-friendly: Very budget-friendly, an old ladder costs nothing if you already have one, or very little from a thrift store.
- DIY steps: Sand the ladder down to remove any rough edges, apply paint or wood stain, and let it dry fully. Lean it against the wall at a slight angle and place bins, baskets, or boards across the rungs to create instant shelving.
Space-Saving & Room Transformation Ideas
Sometimes the biggest challenge in a small craft room isn’t storage, it’s the layout itself. These ideas focus on making smarter use of the space you already have, whether that’s an unused corner, a bare wall, or even a closet.
20. Open Shelving
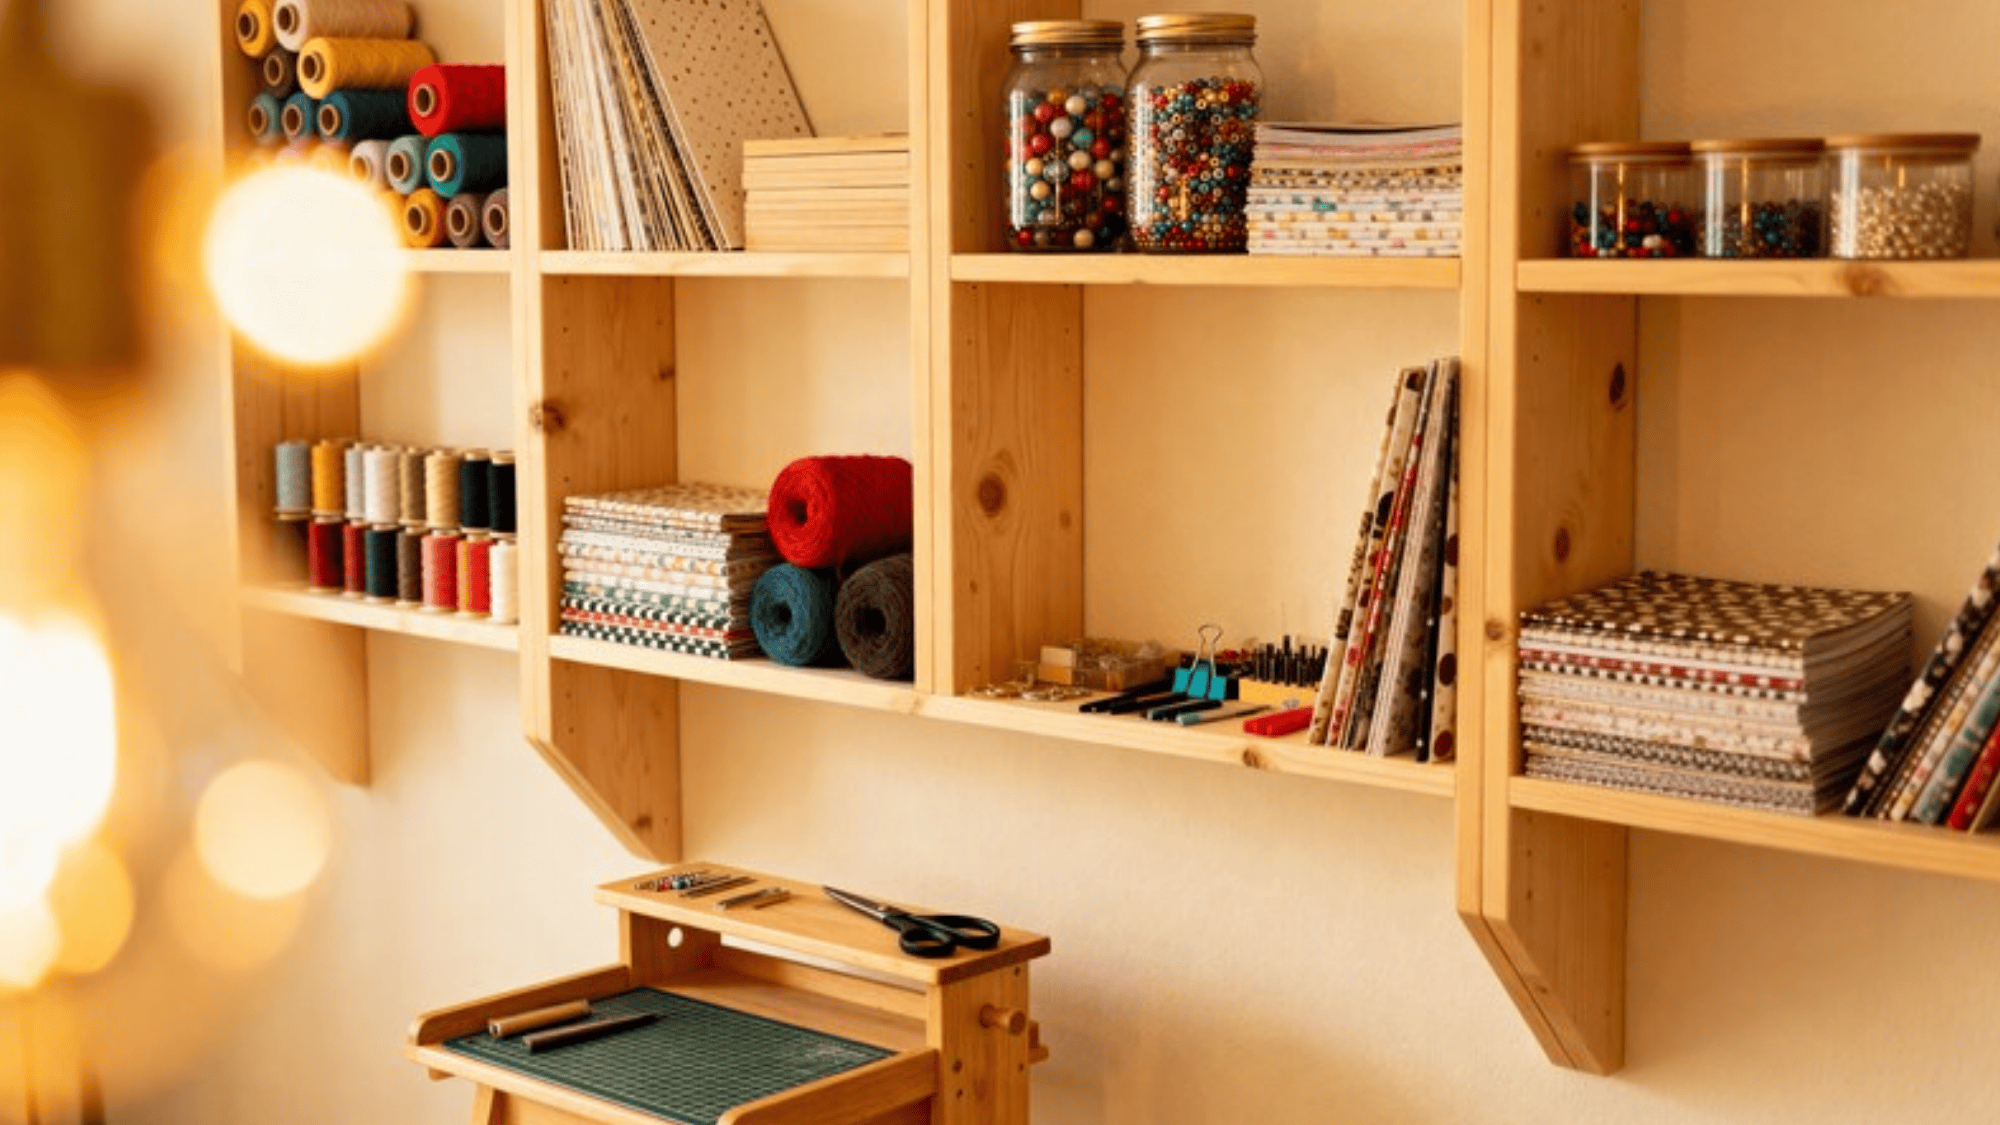
- What it is: Shelves without doors or covers that keep your most-used supplies visible and easy to grab.
- Budget-friendly: Budget-friendly, open shelves are simple to build or buy and don’t require any extra hardware.
- DIY steps: Install shelf brackets at your preferred height, lay boards across them, and arrange supplies in a way that makes sense for your workflow. Keep the most-used items at eye level.
21. Floating Shelves
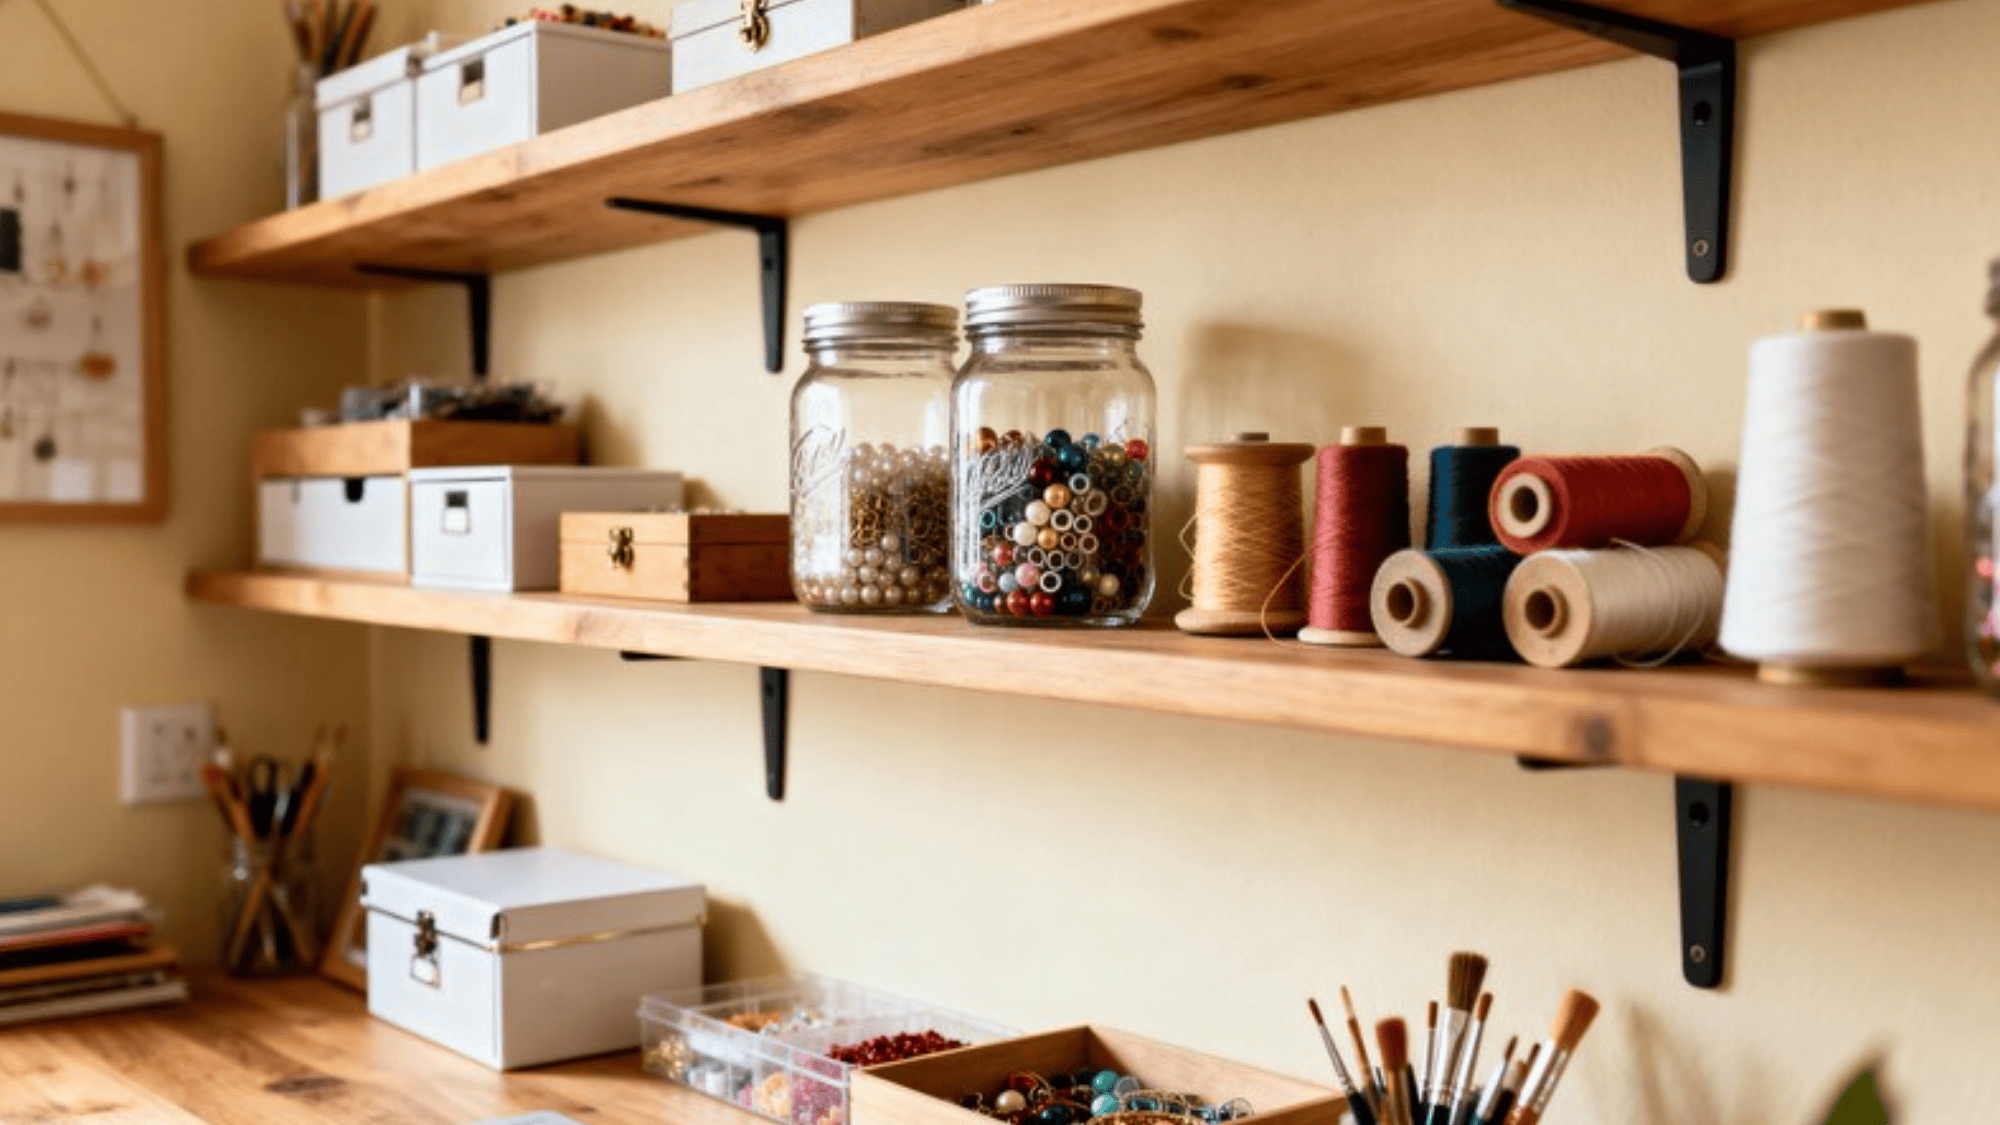
- What it is: Shelves that appear to “float” on the wall without visible brackets, giving the room a clean, open feel.
- Budget-friendly: Budget-friendly, floating shelf kits are widely available and easy to install without professional help.
- DIY steps: Mark the wall at your desired height, locate studs, and screw the internal bracket into place. Slide the shelf casing over the bracket and secure it with the included screws.
22. Creative Wall Hooks
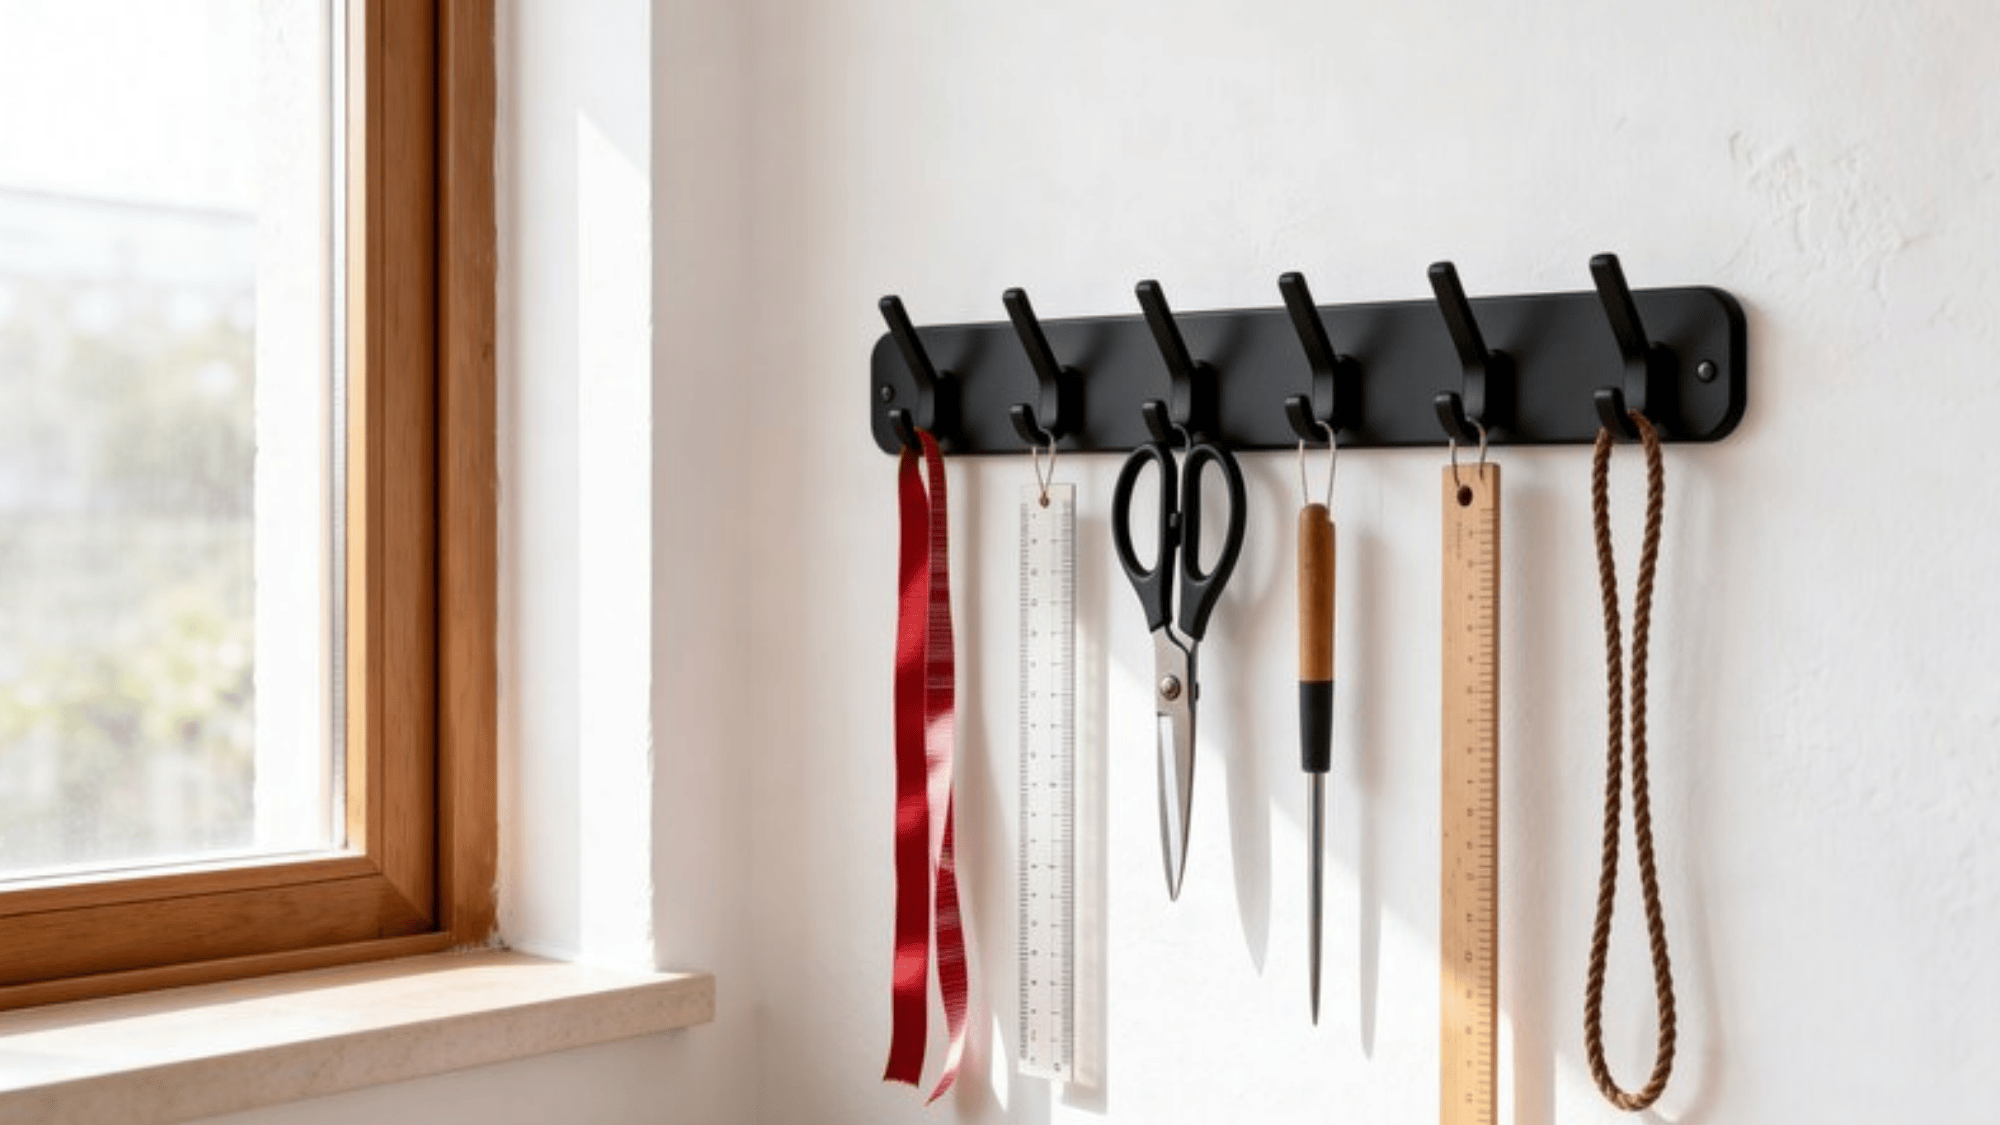
- What it is: Hooks mounted directly on the wall to hang scissors, ribbons, rulers, and other long or looped tools.
- Budget-friendly: Very budget-friendly, a pack of hooks costs just a few dollars, and installation takes minutes.
- DIY steps: Plan your hook layout, mark the positions with a pencil, drill pilot holes if needed, and screw in the hooks. Group similar items together for a more organized look.
23. Built-In Craft Room Nooks
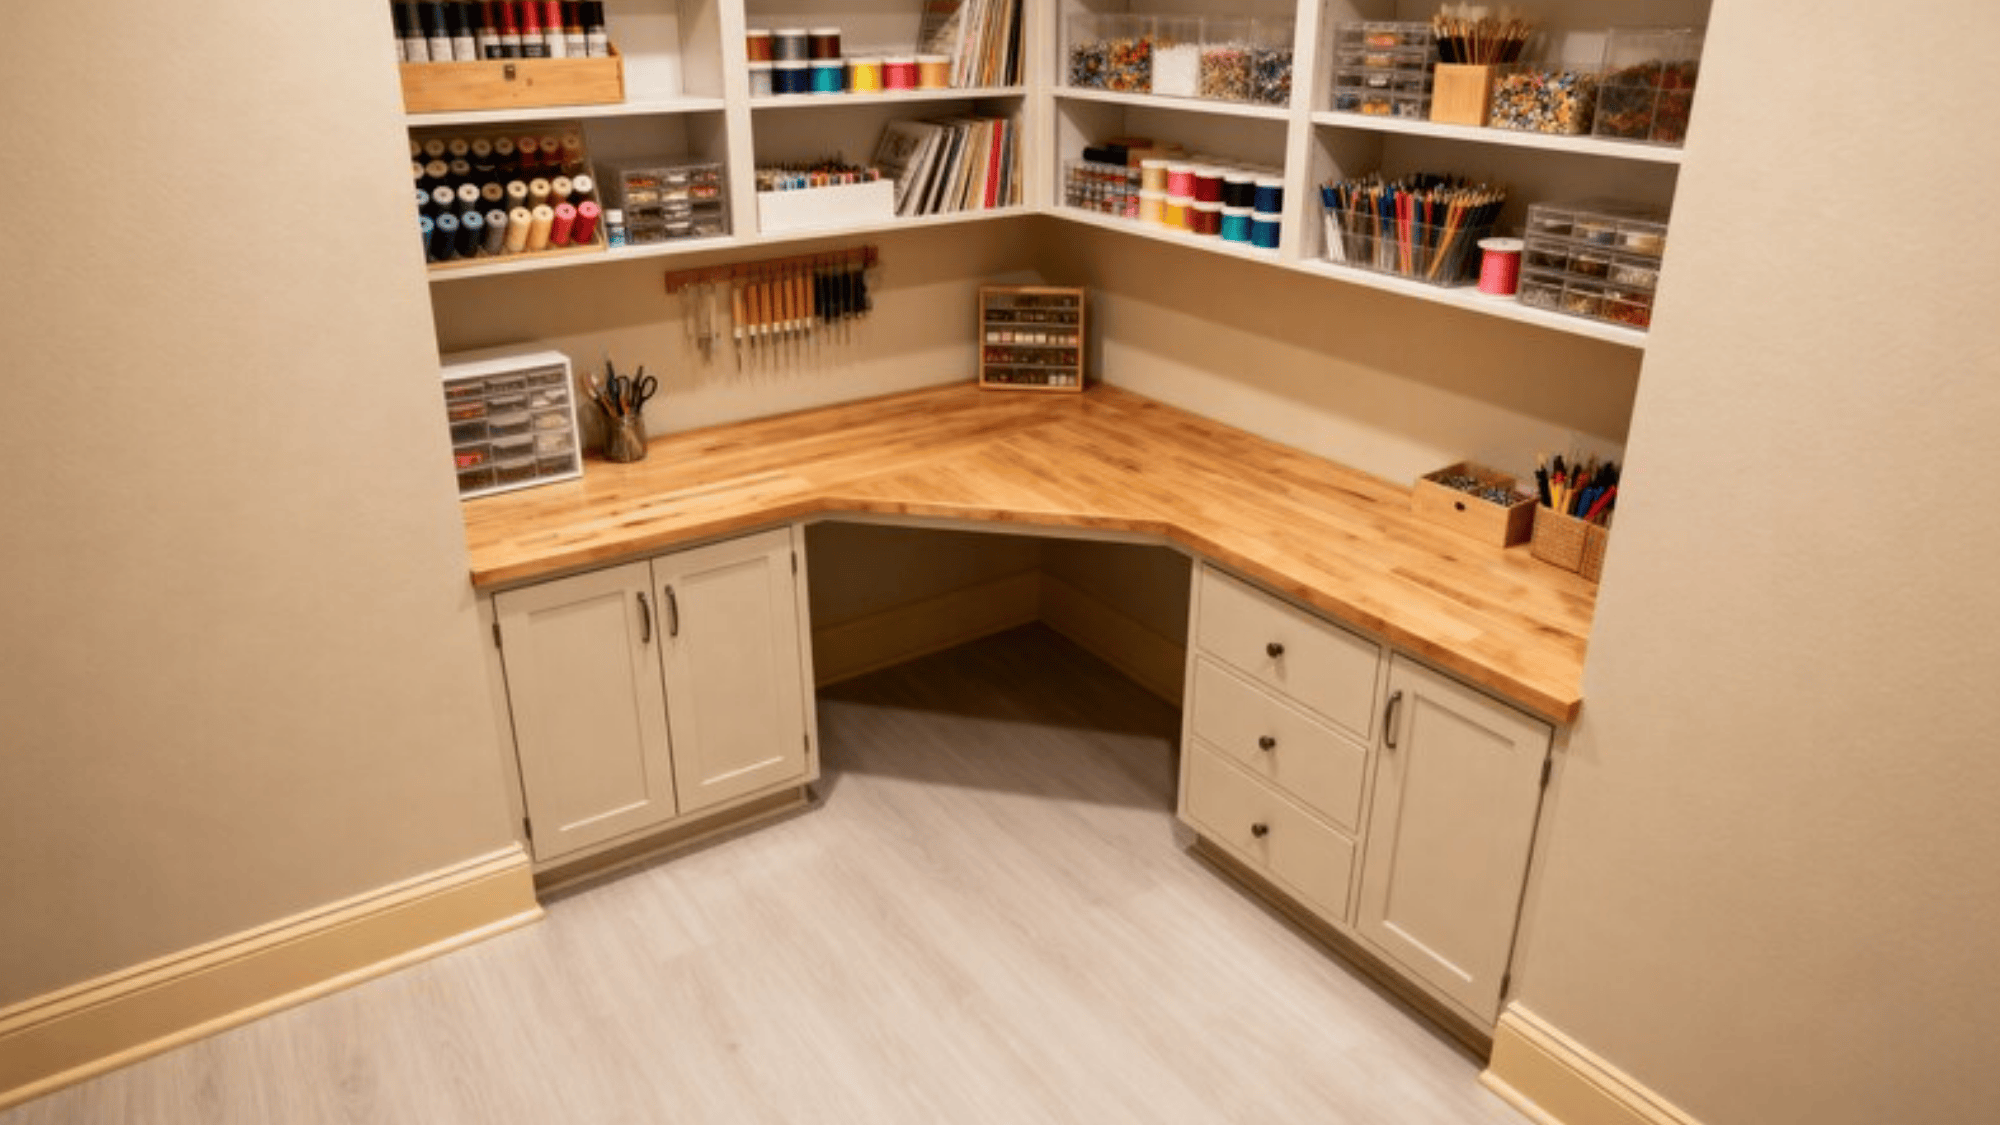
- What it is: A compact, built-in crafting station tucked into a corner, alcove, or unused wall space to create a defined work area.
- Budget-friendly: Moderately budget-friendly, costs vary depending on size, but using basic lumber and pre-made shelving keeps it affordable.
- DIY steps: Measure the nook, build a simple frame using lumber, add shelves at your preferred heights, and install a work surface at desk height. Sand and paint, then add lighting to finish the space.
24. Sliding Barn Doors
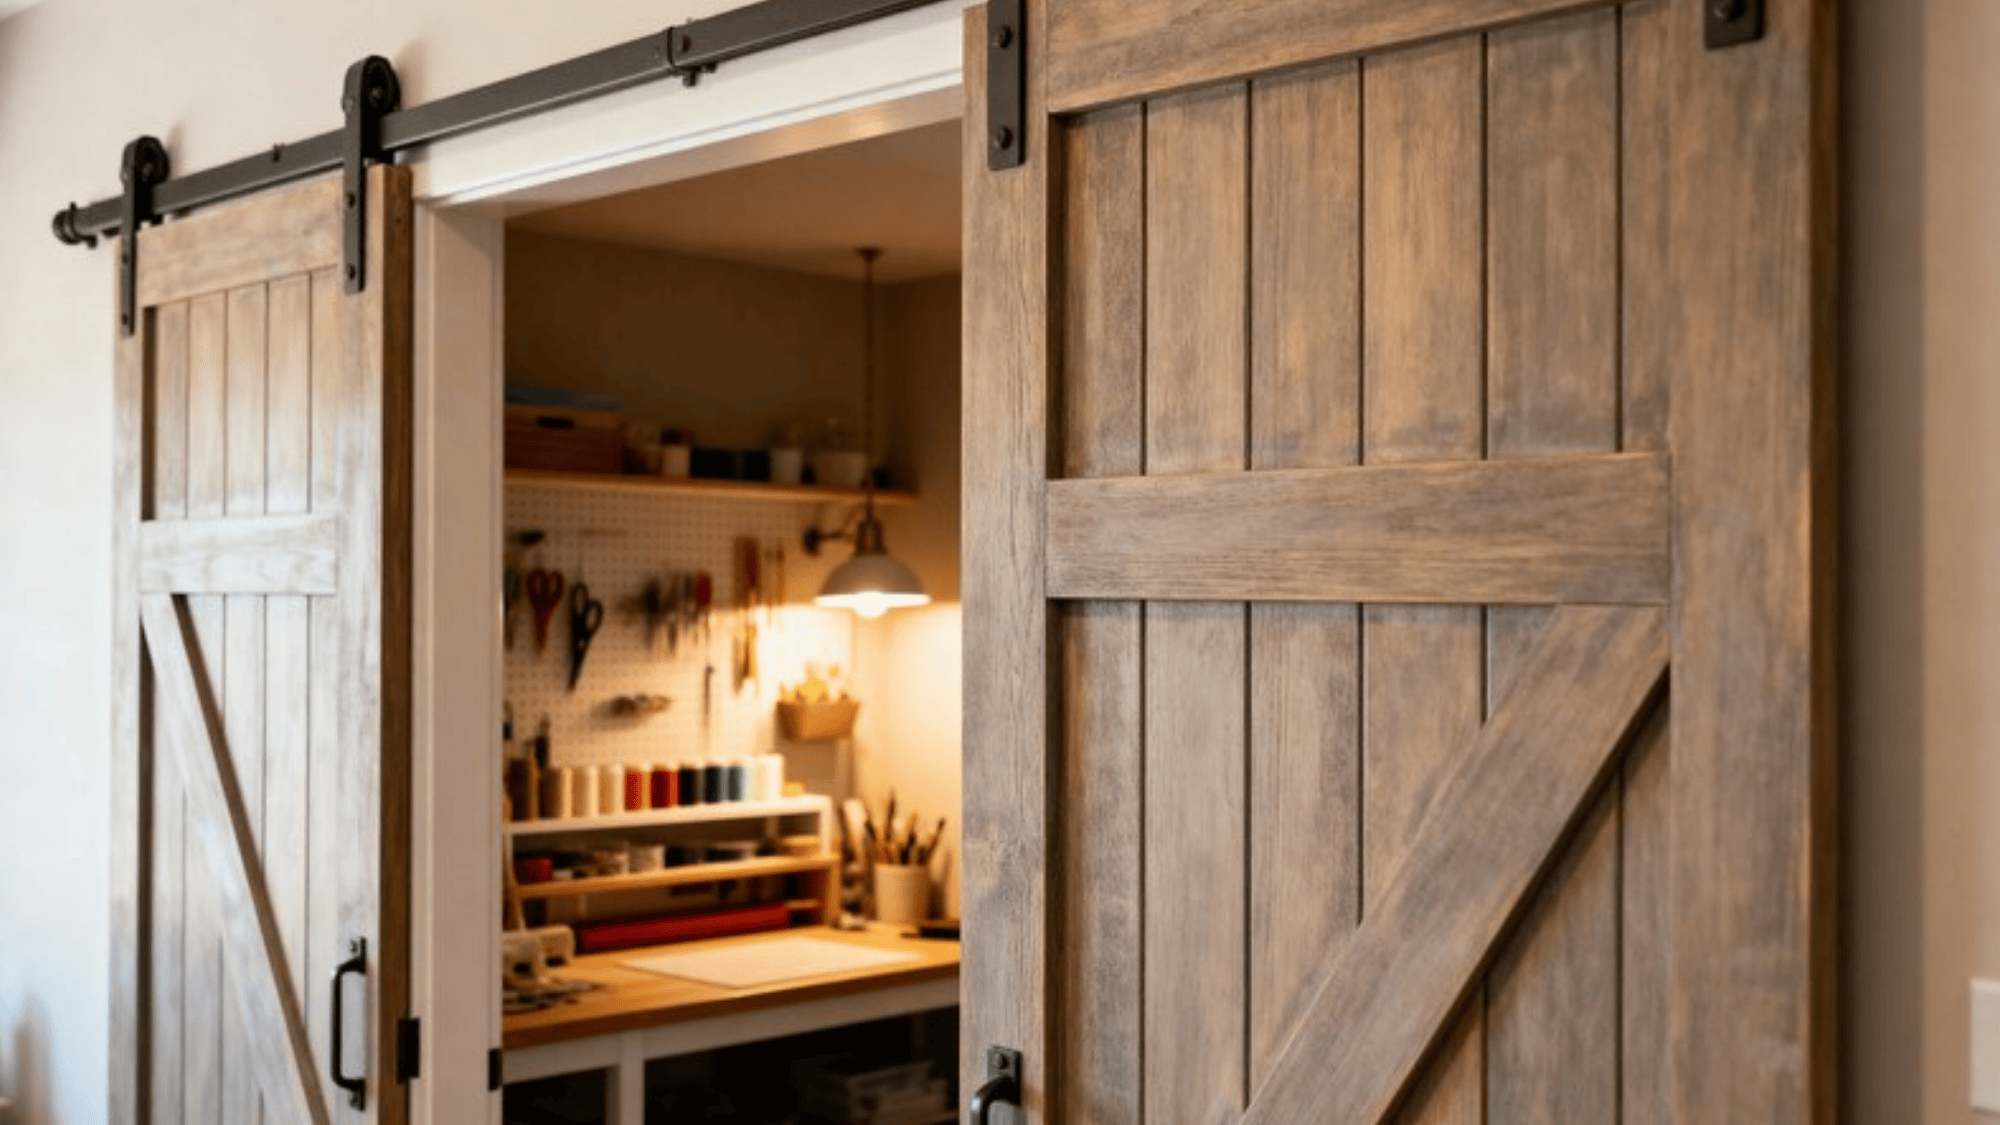
- What it is: Barn-style sliding doors installed in front of your craft space to conceal it when not in use.
- Budget-friendly: Moderately budget-friendly, hardware kits vary in price, but DIY installation keeps costs down.
- DIY steps: Install the overhead track according to kit instructions, hang the door panels, and adjust the rollers for smooth sliding. Paint or stain the doors to match your room’s look.
25. Convert a Closet into a Crafting Space
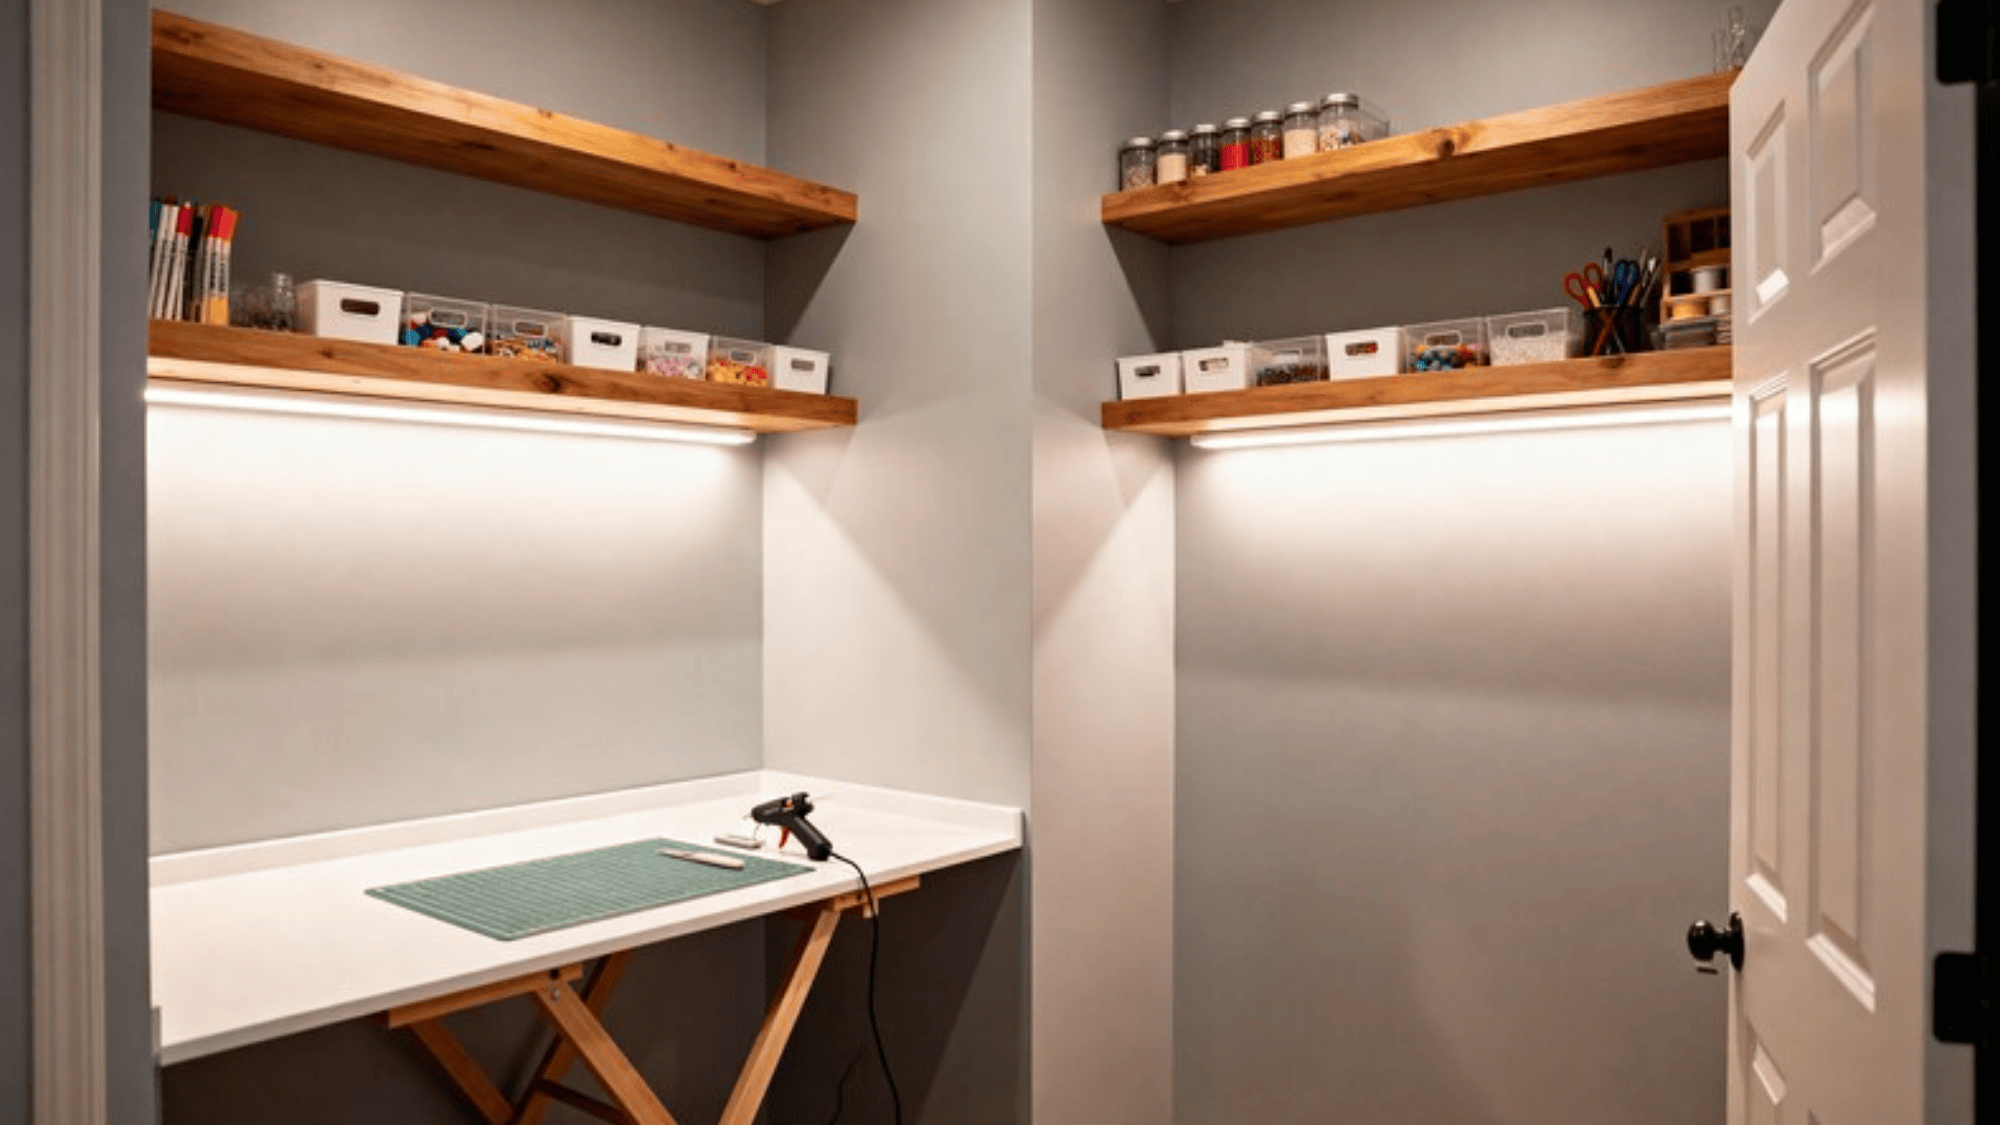
- What it is: A standard closet converted into a fully functional mini craft room with shelves, a work surface, and lighting.
- Budget-friendly: Budget-friendly, most of the work involves basic shelving and a light source, both of which are affordable.
- DIY steps: Clear out the closet completely, install shelves along the sides and back wall, and add a fold-down or fixed work surface at desk height. Mount a plug-in light or battery-powered LED strip inside and organize supplies on the shelves.
Decor & Inspiration Ideas
A craft room that feels good to be in makes a real difference to how motivated and creative you feel. Beyond storage and furniture, a little personality goes a long way.
26. Craft Room Gallery Wall
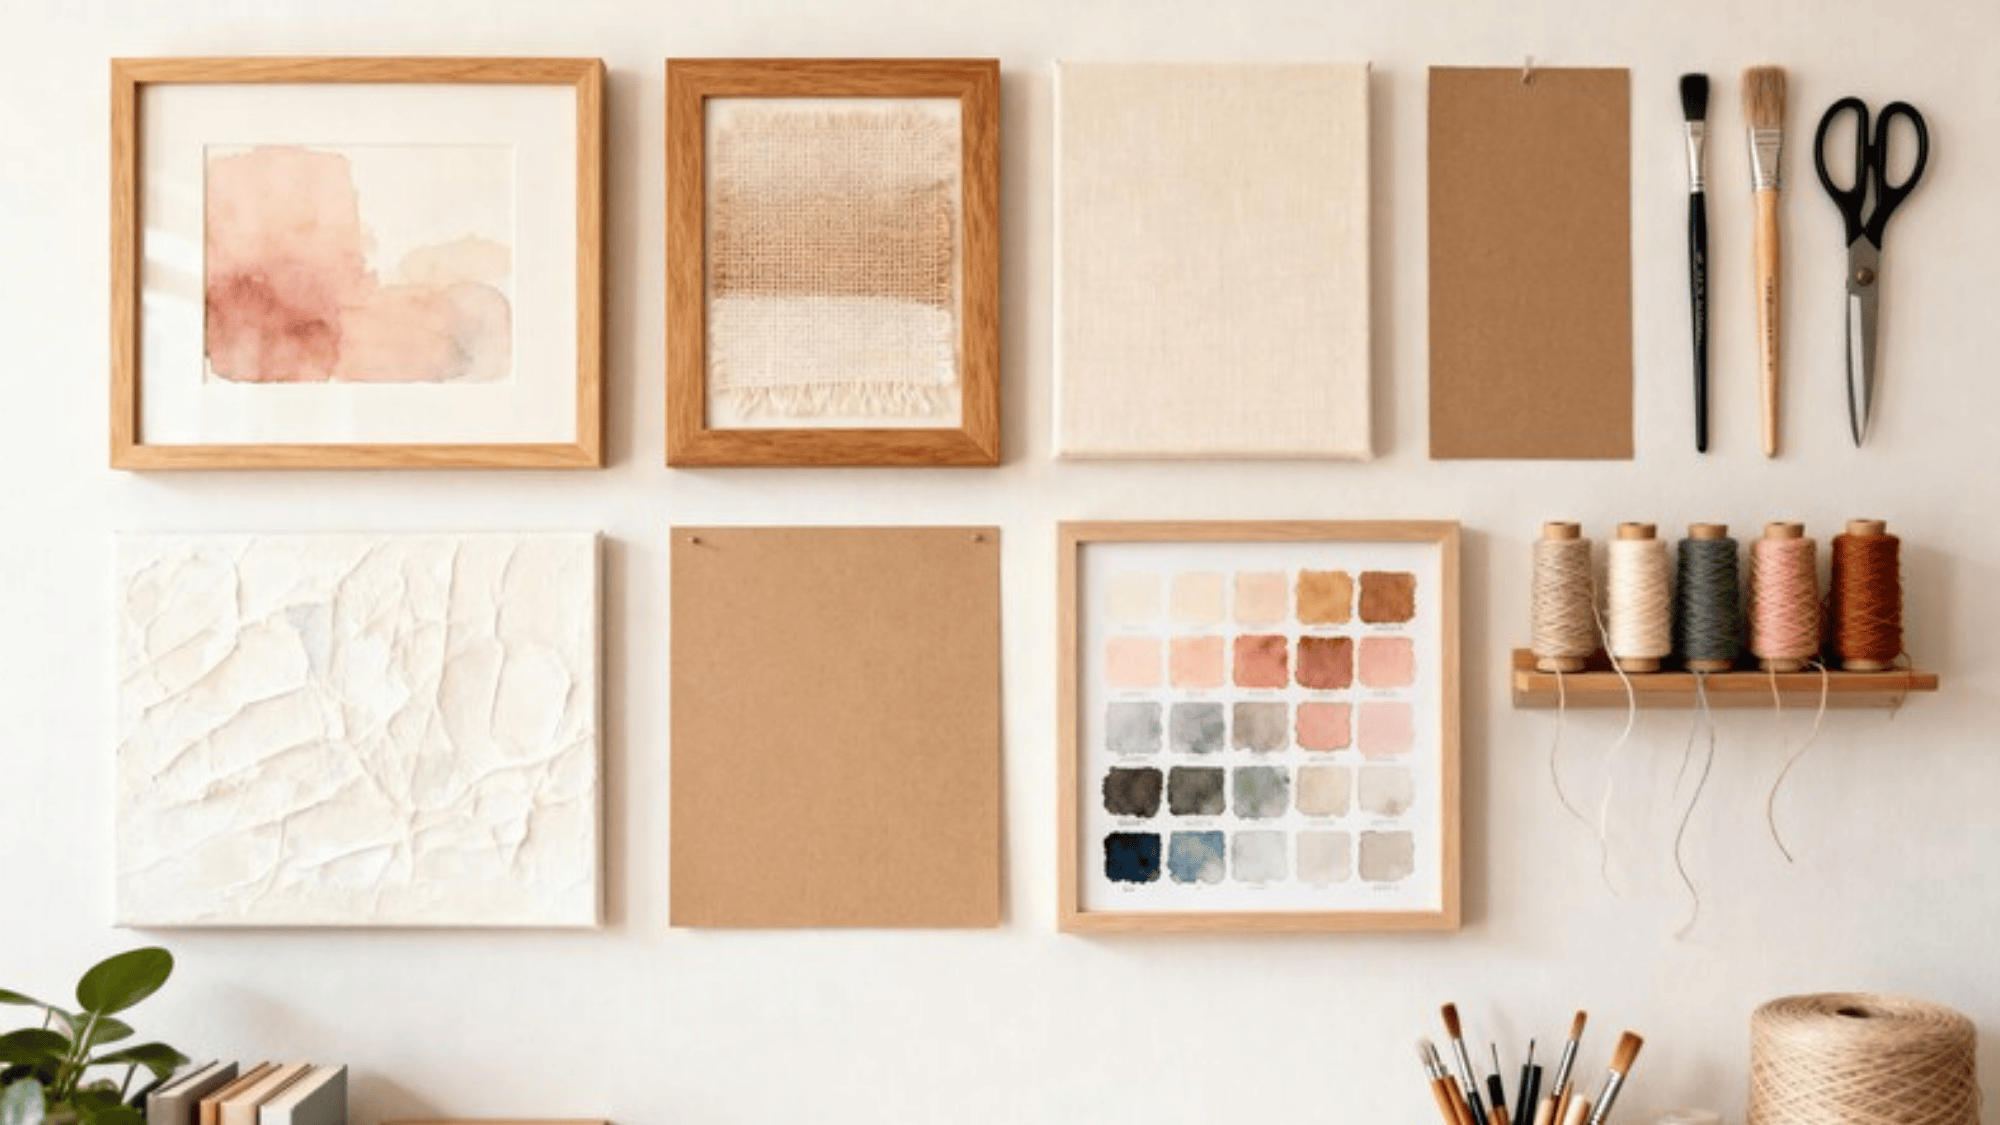
- What it is: A curated wall display featuring artwork, quotes, color swatches, and crafting inspiration to personalize your space.
- Budget-friendly: Very budget-friendly, print your own images, use old frames, or repurpose materials you already have.
- DIY steps: Collect frames in complementary sizes, lay them out on the floor to plan the layout, then transfer the arrangement to the wall using nails or adhesive strips. Fill frames with prints, samples, or handwritten notes.
27. DIY Craft Room Inspiration Boards
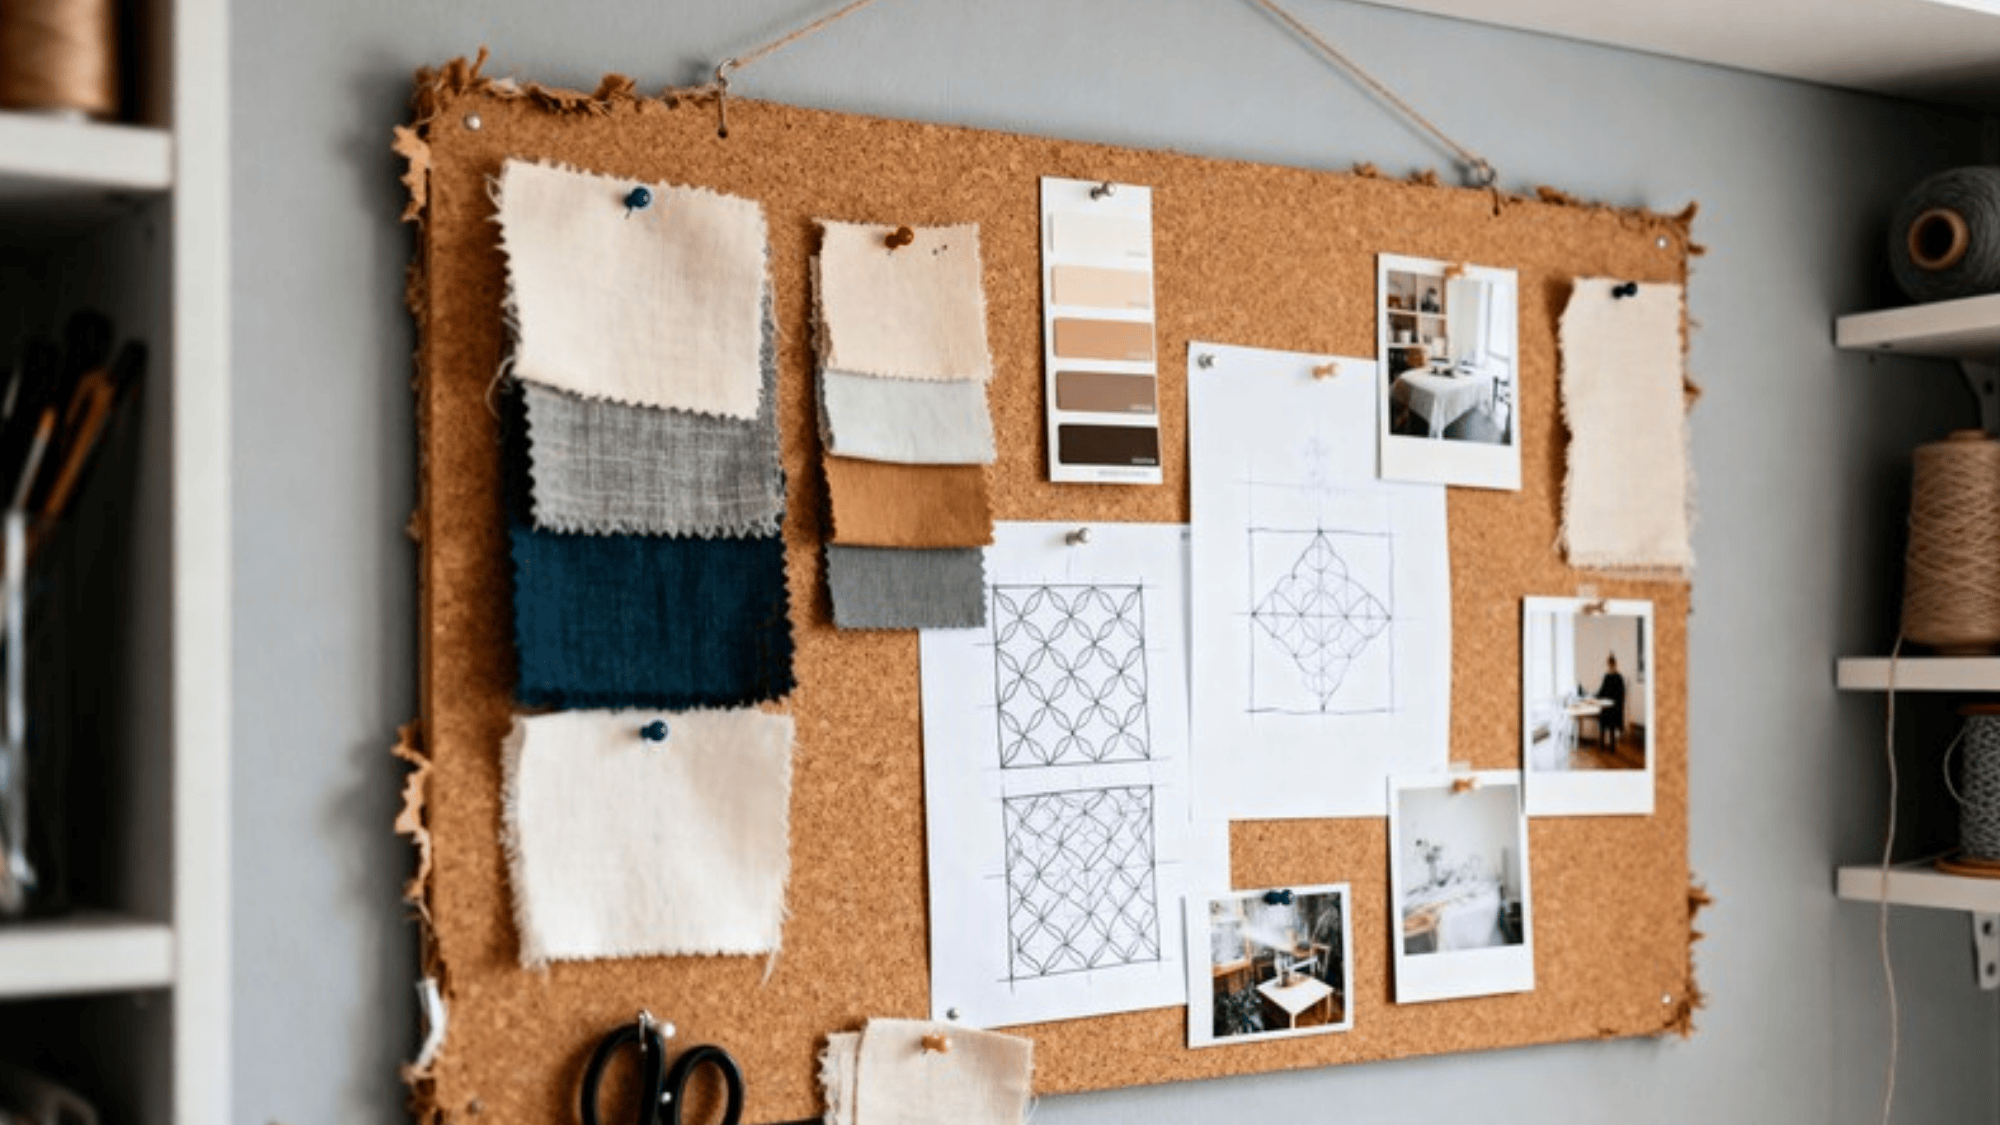
- What it is: A dedicated board, cork, foam, or fabric-covered, where you pin ideas, color palettes, patterns, and project inspiration.
- Budget-friendly: Very budget-friendly, a basic corkboard and some pins are all you need to get started.
- DIY steps: Mount a corkboard or wrap a foam board in fabric and secure it with staples at the back. Hang it at eye level above your desk and start pinning swatches, sketches, and reference images.
Conclusion
A small space was never really the problem; the lack of a plan was. With the right DIY small craft room ideas, even the tightest corners can become a workspace you actually enjoy spending time in.
The small craft room designs and layouts covered in this blog prove that you don’t need a big budget or a large room to build something functional and personal.
Start with one or two ideas that fit your space and budget, and build from there.